This is the user manual for Persee, softmode's customizable vtuber model.
¶ Included Files
| Folder | Contents |
|---|---|
| /Persee_Vx_x_x/ (root) | /Live2DModels/ /Texture Presets/ /Texture PSDs/ Persee Terms of Use.txt |
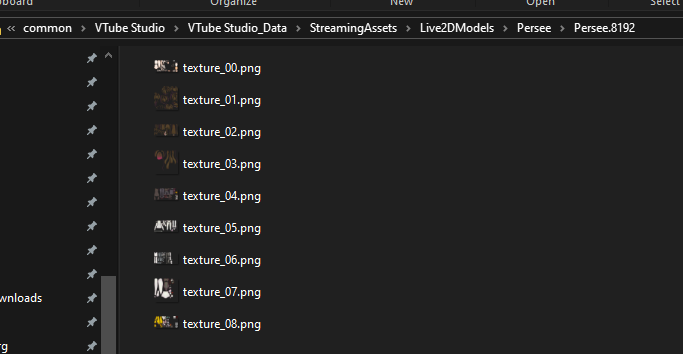
| /Persee_Vx_x_x/Live2DModels/Persee |
/Expressions/ (contains 2 files) /Persee.8192/ (contains 9 files) /Presets/ (contains 6 files) /Toggles/ (contains 1 file) icon.png items_pinned_to_model.json Persee.cdi3.json Persee.moc3 Persee.model3.json Persee.physics3.json Persee.vtube.json |
| /Persee_Vx_x_x/Texture Presets/ |
/Preset_Aquila/ (contains 9 files) /Preset_Blanc/ (contains 9 files) /Preset_Lyra/ (contains 9 files) /Preset_Orion/ (contains 9 files) /Preset_Puppis/ (contains 9 files) /Preset_Pyxis/ (contains 9 files) /Preset_Usagi/ (contains 9 files) |
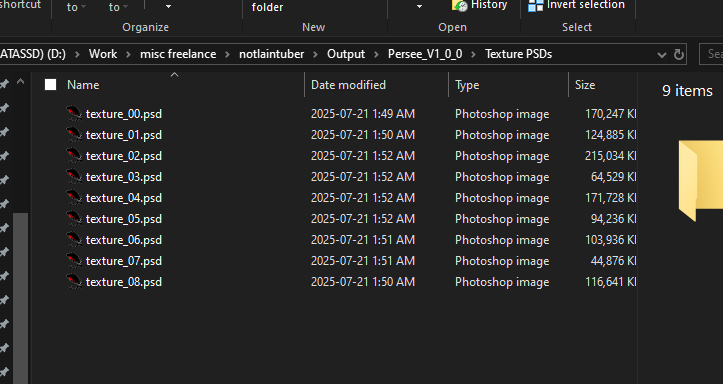
| /Persee_Vx_x_x/Texture PSDs/ |
texture_00.psd texture_01.psd texture_02.psd texture_03.psd texture_04.psd texture_05.psd texture_06.psd texture_07.psd texture_08.psd |
¶ Installation
- Download and extract the latest version of Persee from your storefront of choice to your hard drive. Extract it, and open the folder’s contents.

- Open the Live2DModels folder. Copy the Persee folder to your Vtube Studio’s Live2DModels folder.

- To find your Vtube Studio Models Folder, open Steam, right click Vtube Studio in your Library, hover your mouse over Manage, and click Browse Local Files.

- Open the Vtube underscore Studio underscore Data folder, the StreamingAssets folder, then the Live2DModels folder. Copy the Persee folder from before into this folder. It should sit alongside any other models you have already installed.
- Persee is now installed. To configure Persee for your movement, launch Vtube Studio, then enable Persee.


As a side note, this guide assumes basic understanding of Vtube Studio, but this is my recommended tube Studio basic tutorial. If you still have questions afterwards, feel free to reach out in the Discord Server, where me or another user might be able to help.
¶ Configure Persee
- Once Persee is enabled on your screen, tracking is enabled, and your tracking is calibrated, you might notice she’s leaning sideways or forward a lot. By default, Persee is designed to lean sideways based on your face’s Horizontal Position and forward depending on how close you are to the camera. You’ll need to adjust the Input Range of these parameters to match your movement, or disable them altogether.
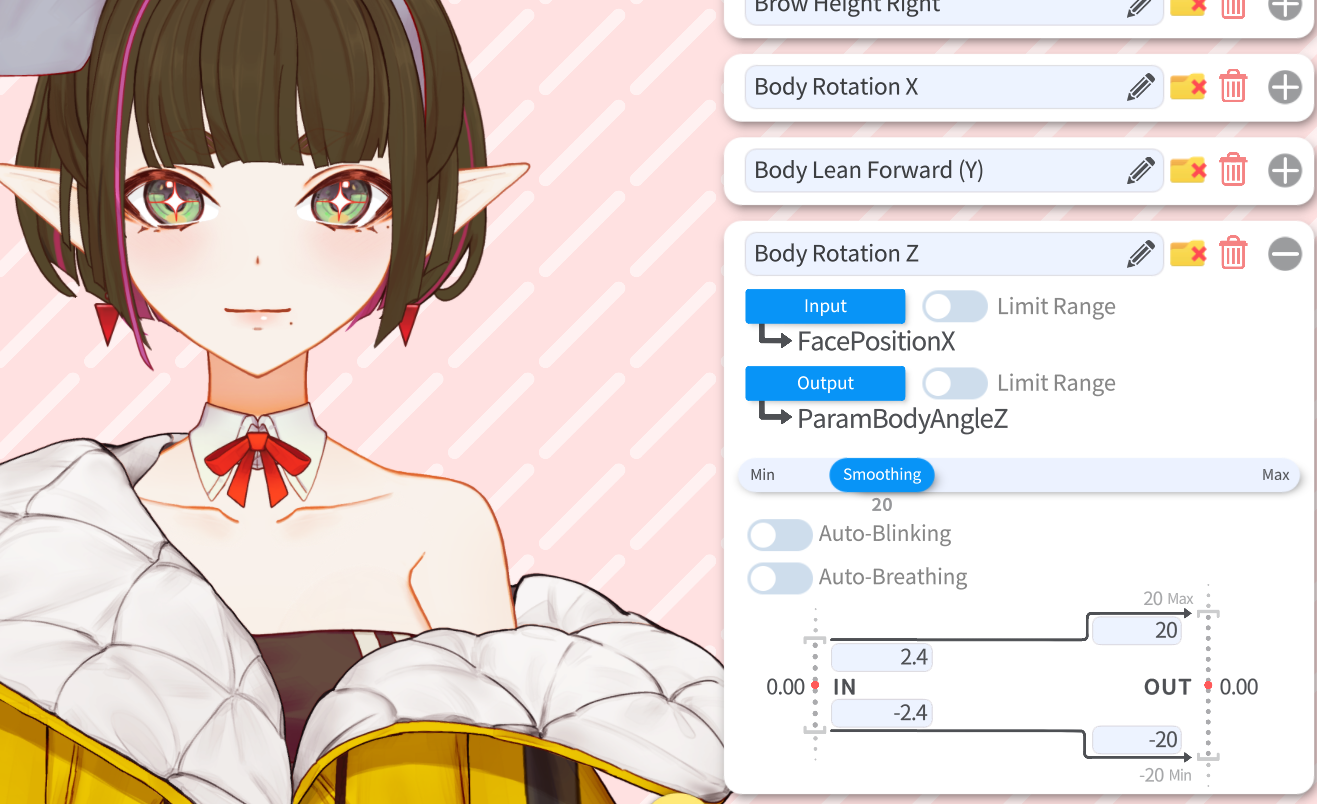
- To adjust Persee’s Sideways Lean, click on the Settings gear, open Model Settings, scroll down to the Body Rotation Z parameter, and expand it.

- To make Persee lean less, make the numbers next to “In” bigger, and to make her lean more, make the numbers smaller. The box above “In” should be positive and the box below “In” should be negative. I recommend keeping these numbers the same value right of the minus.
- To adjust Persee’s Forward Lean, scroll up to the Body Lean Forward (Y) parameter, and expand it.

- Disable the “Limit Range” switch to the right of the Input Box, then sit in a natural position. On the bottom left of the Body lean Forward (Y) parameter box, you’ll see a number that goes up and down depending on how close you are to the camera. In the field above “In”, sit in a natural position and set this number slightly below the input number.
- Next, lean forward a comfortable amount, read the input number, and set the field below “In” to your current input.
- Finally, enable “Limit Range” next to Input.
Persee is now configured. Move around to make sure you like the movement, and adjust the input ranges as necessary. I recommend leaving the output ranges alone.
One sidenote: this isn’t unique to Persee, but depending on your anatomy, tracking device, tracking position, and mannerisms, you might need to adjust other parameters here. If you notice Persee’s eyes are always open or always half closed, then you might need to recalibrate or adjust some input ranges.
¶ Customing Persee
This part of the manual shows how to customize Persee's parts, colors, textures, and load included presets.
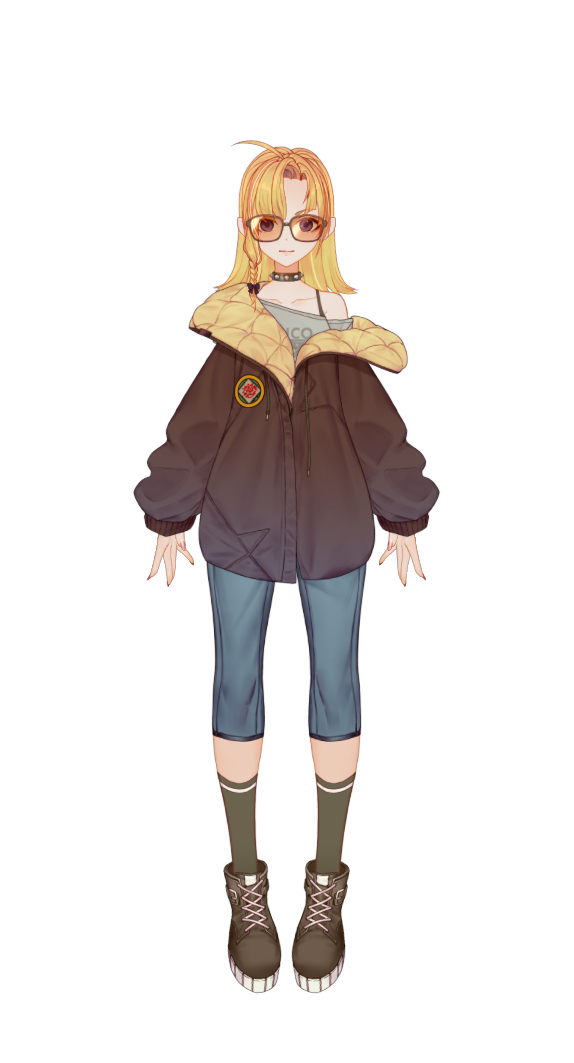
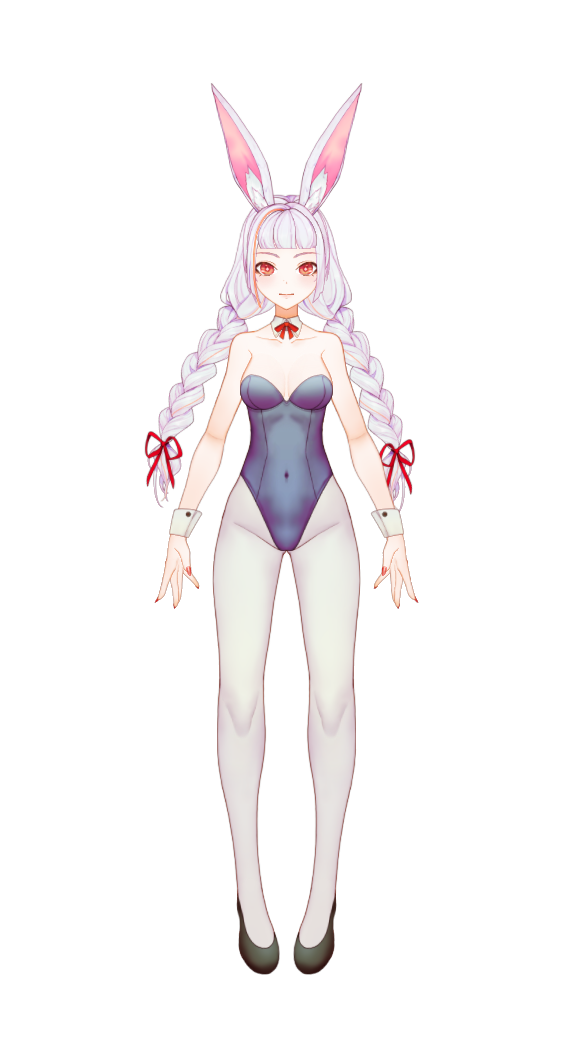
¶ Included Presets:
Persee comes with 6 presets, which includes customization expressions and texture sets. Here are their names so you can find the associated texture set in the Texture Presets folder easier.
| Preset Name | Appearance | Preset Onscreen Button |
|---|---|---|
| Preset_Lyra |
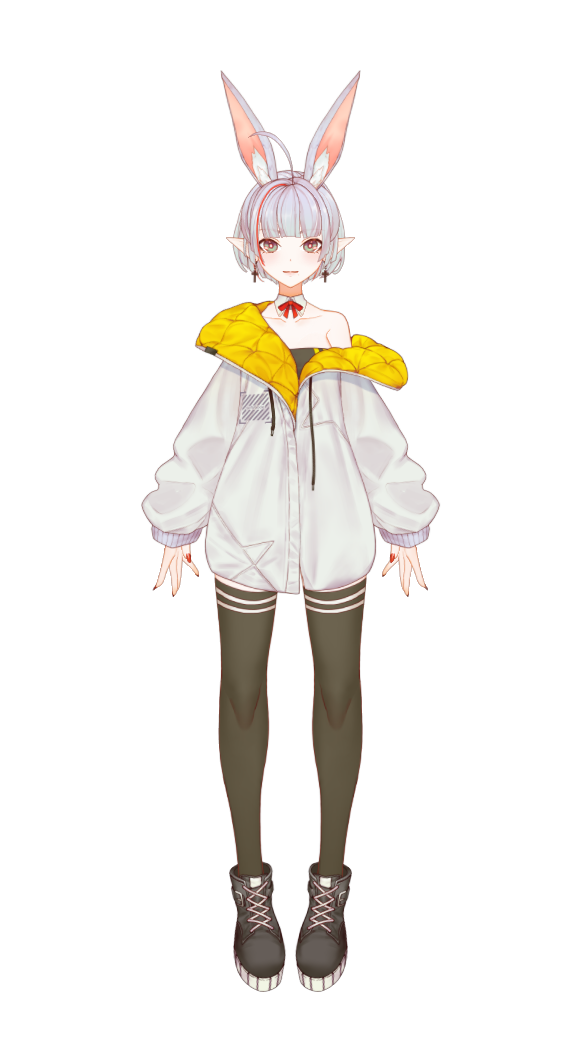
|
3 |
| Preset_Aquila |
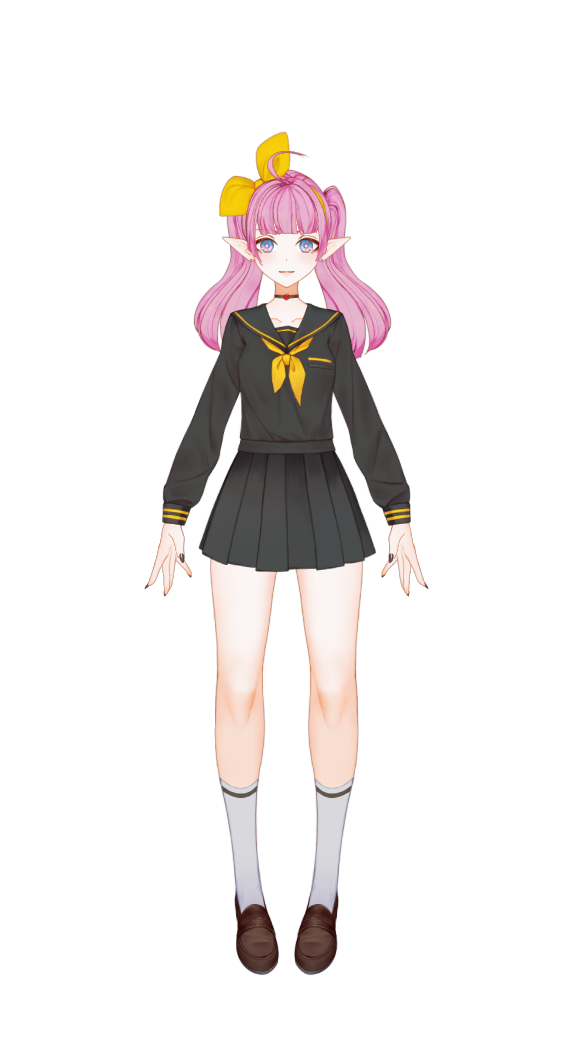
|
4 |
| Preset_Pyxis |
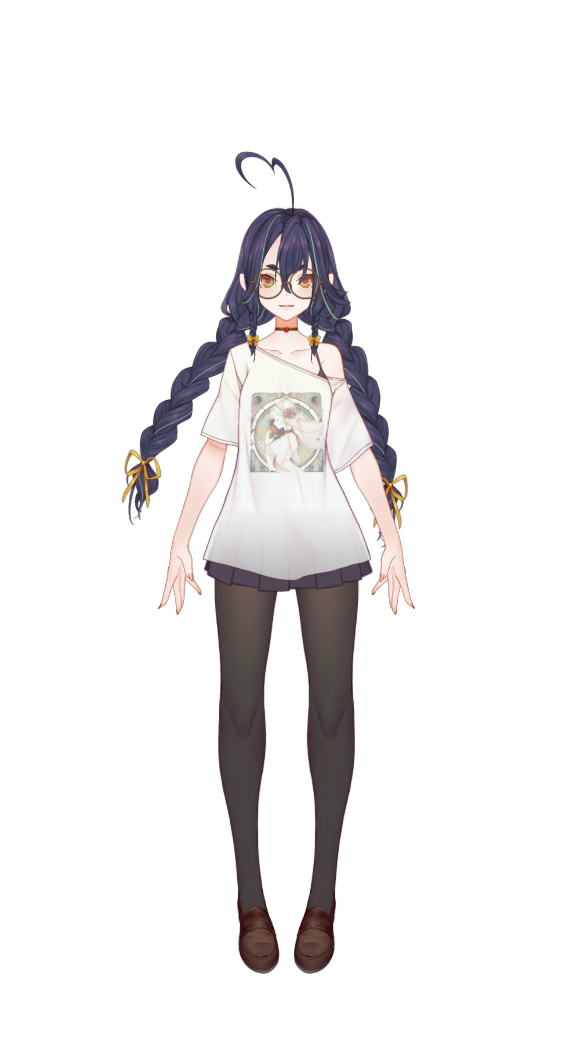
|
5 |
| Preset_Puppis |
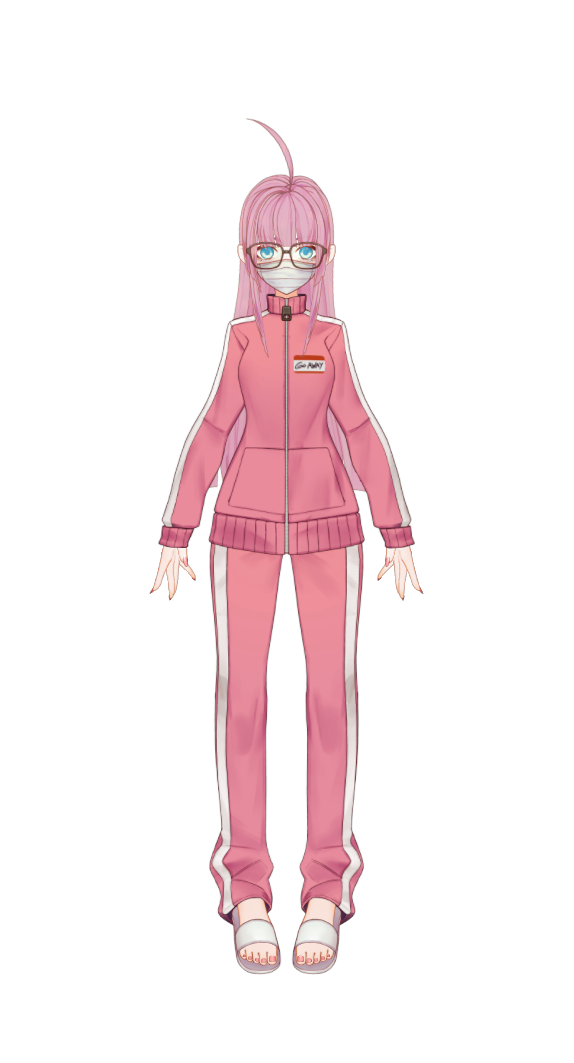
|
6 |
| Preset_Orion |
|
7 |
| Preset_Usagi |
|
8 |
¶ Selecting Presets:
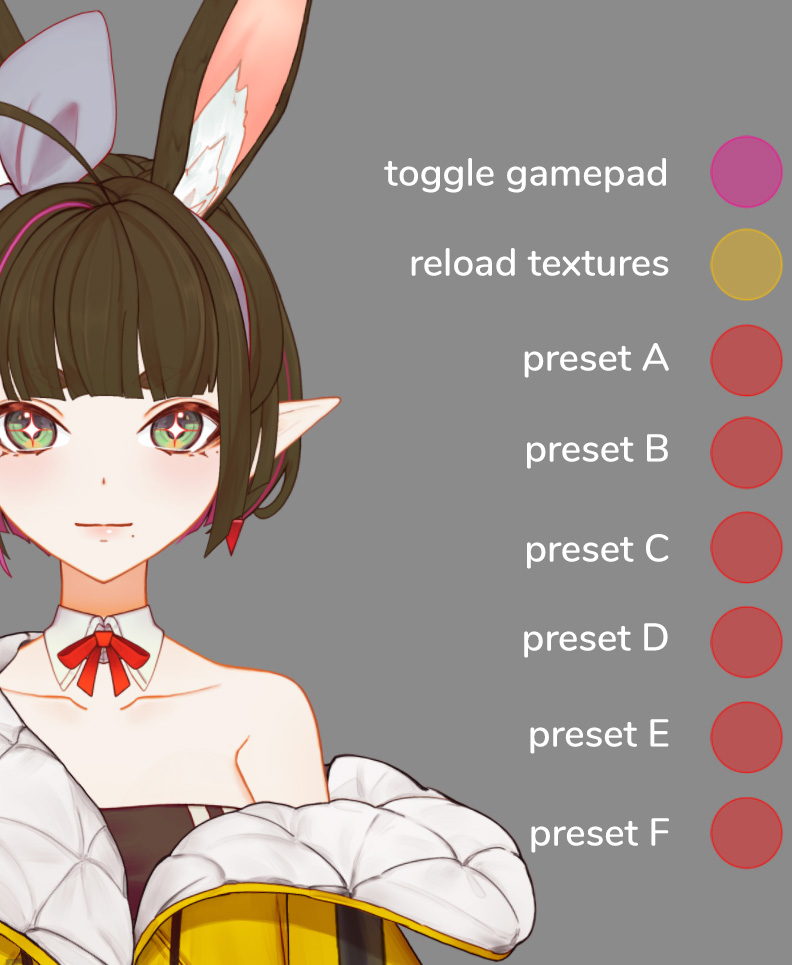
When Persee is opened, you’ll notice eight on-screen buttons to the right of the screen.
- The first magenta button toggles the gamepad.
- The second yellow button is a shortcut for reloading textures.
- The final six red buttons are for enabling and disabling presets I’ve included with Persee. The names of each preset will be displayed on the screen now. Feel free to pause and take a screenshot, or click the link in the video description that takes you to the manual.
- To enable a preset, press a present button, navigate to the folder where you downloaded Persee, open the Texture Presets folder, the corresponding Preset_ folder, then copy these files into your Live2DModels/Persee/Persee.8192/ folder, overwriting them.

- Next, press the yellow button below the gamepad toggle to reload the textures.
- To disable a preset and go back to the default, press the same red button again, copy the Preset_Blanc textures to your Live2DModels/Persee/Persee.8192/ folder, overwriting them. Then press the yellow button to reload textures.
You can mix and match individual textures from different presets as desired. Body and hair are on Textures 00 to 03, and clothing from 04 to 08.
¶ Selecting Parts in Vtube Studio (Demo):
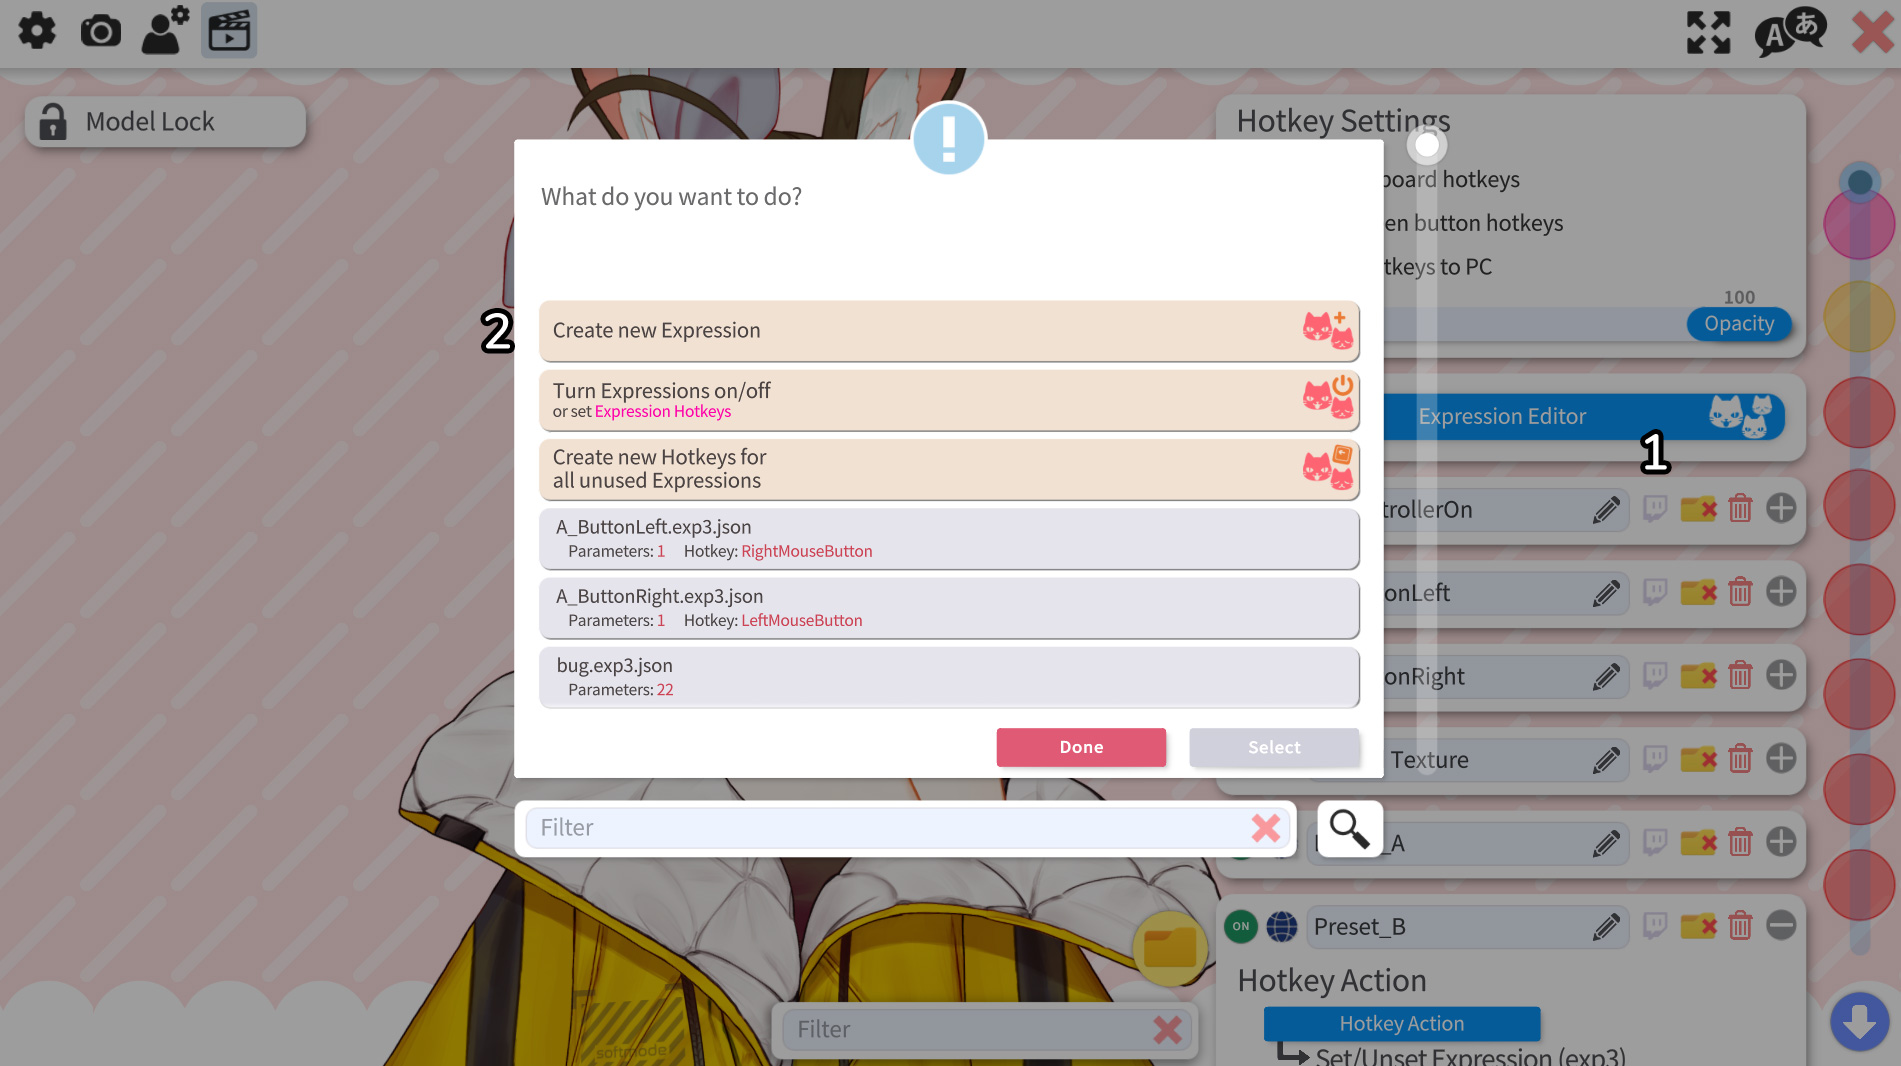
- To customize Persee’s parts, go to Animation settings, open the Expression Editor, and click Create New Expression.
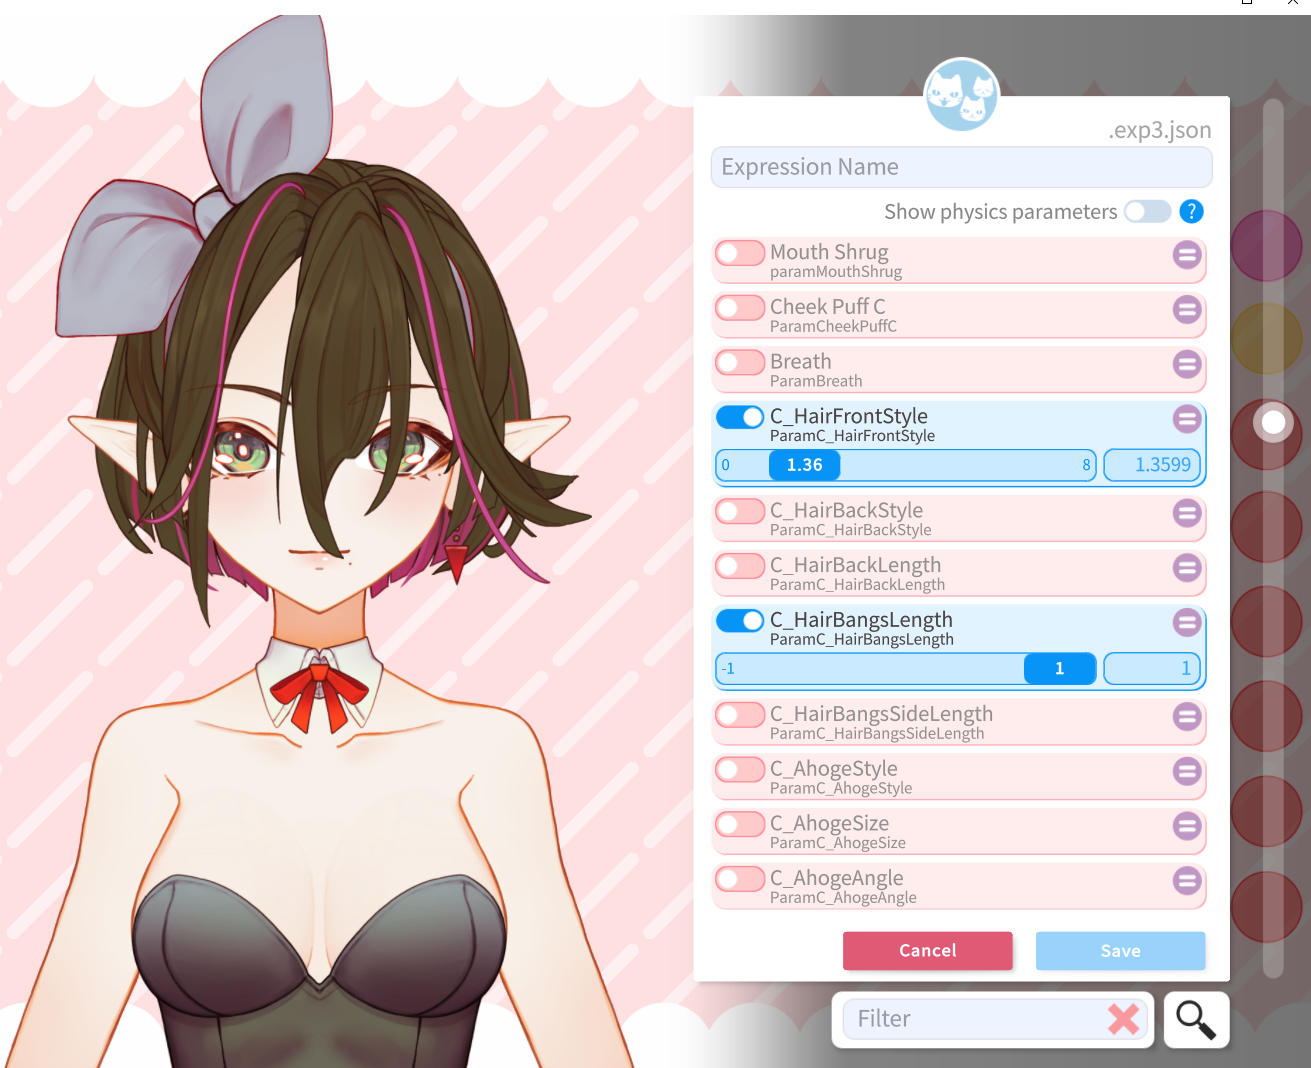
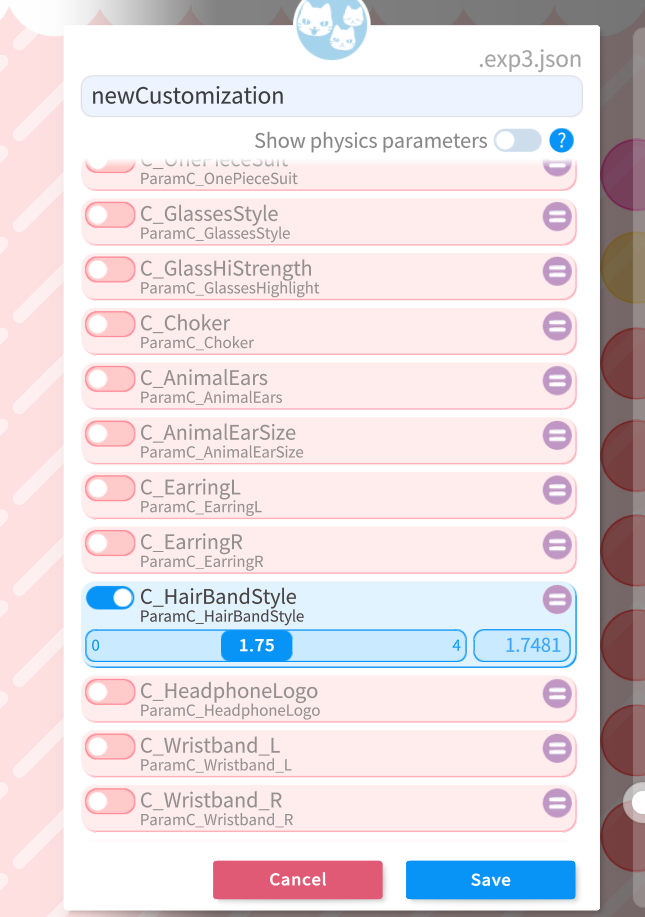
- Scroll down to the parameters prefixed with C_.
- For this demo, change the bangs. Find C_HairFrontStyle, enable the slider, and drag to a different style of bangs.
- Next, change the length by enabling C_HairBangsLength, and moving the slider all the way to the right.
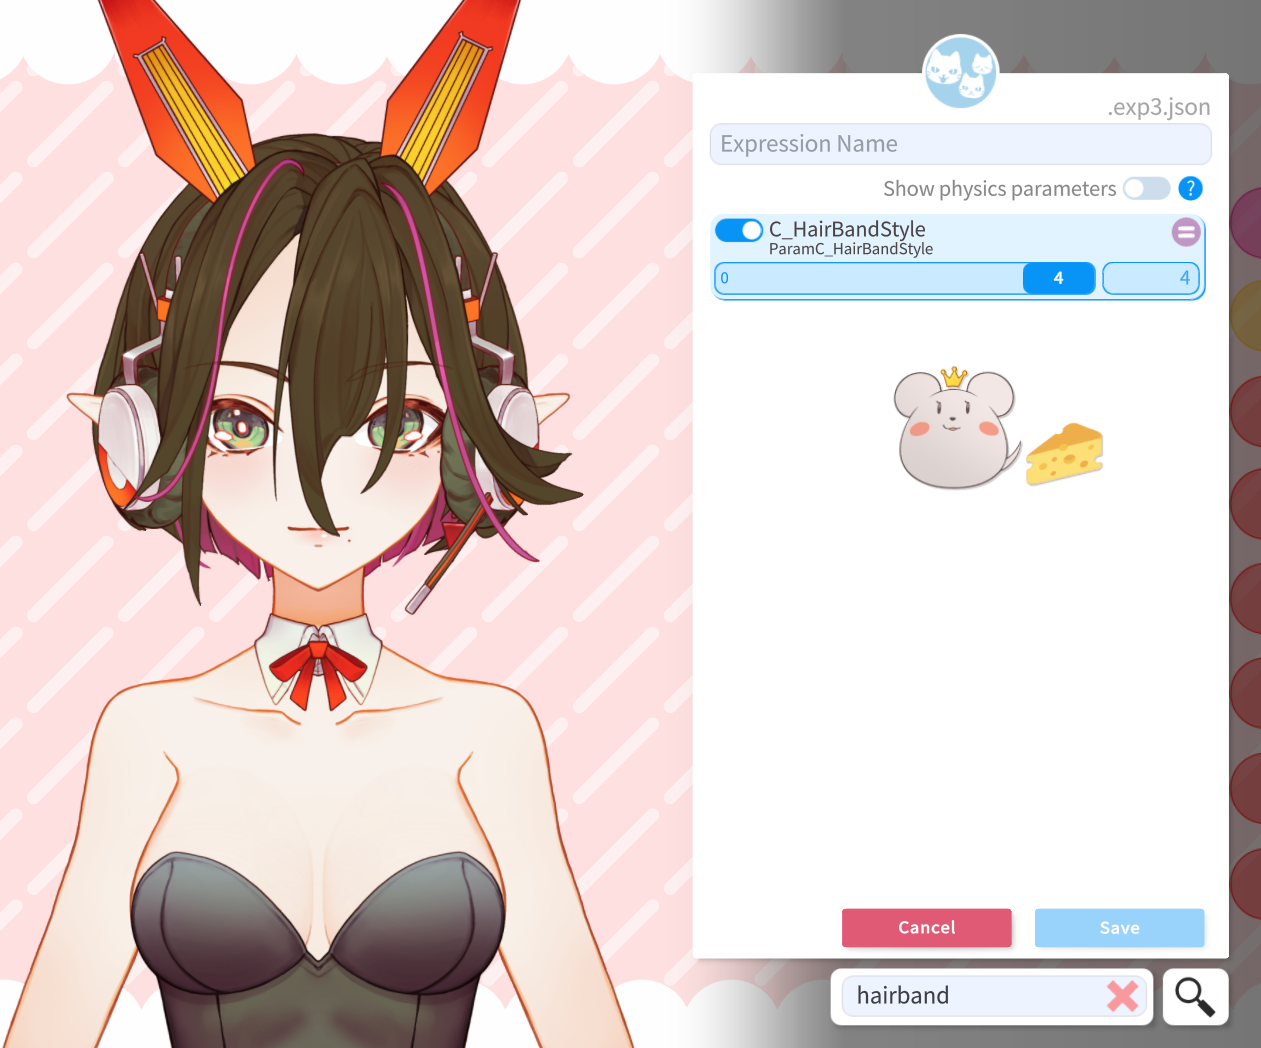
- Finally, to give her headphones instead of a hair ribbon: On the bottom right of VTubeStudio, there is a Filter input field. Type “HairBand” into it, and change the C_HairBandStyle parameter.
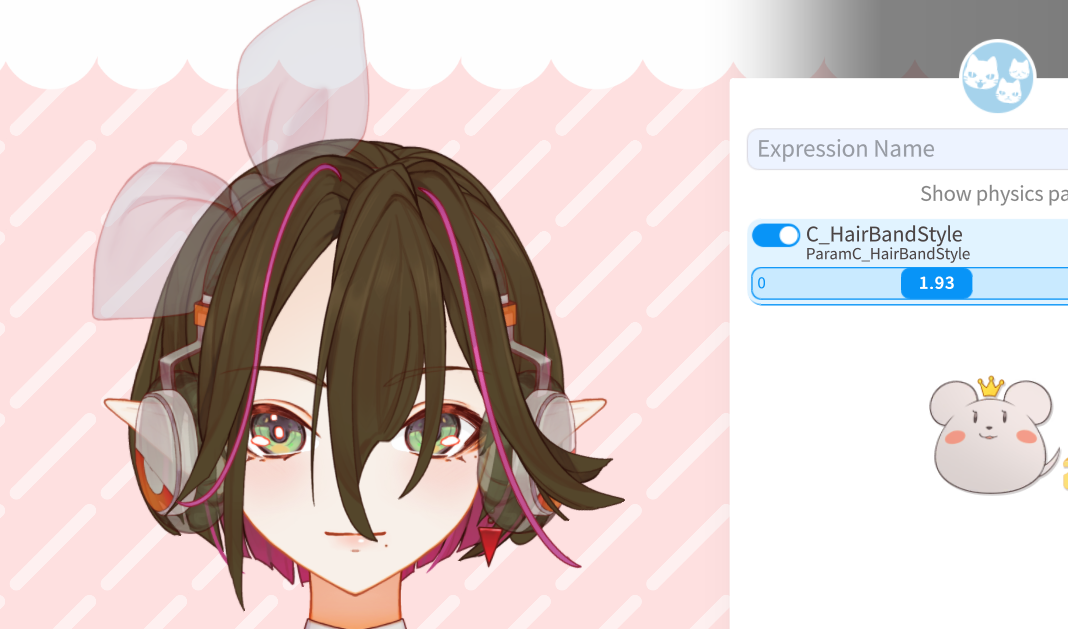
- Some parameters, such as the Hairstyles, Clothing Parts, and Eye Styles are Selectors. Keep the decimal point of these values between 0 and 0.8, or you might end up with translucent parts.
- Once you are happy with your parts, name your preset using the Expression Name field, and press Save.
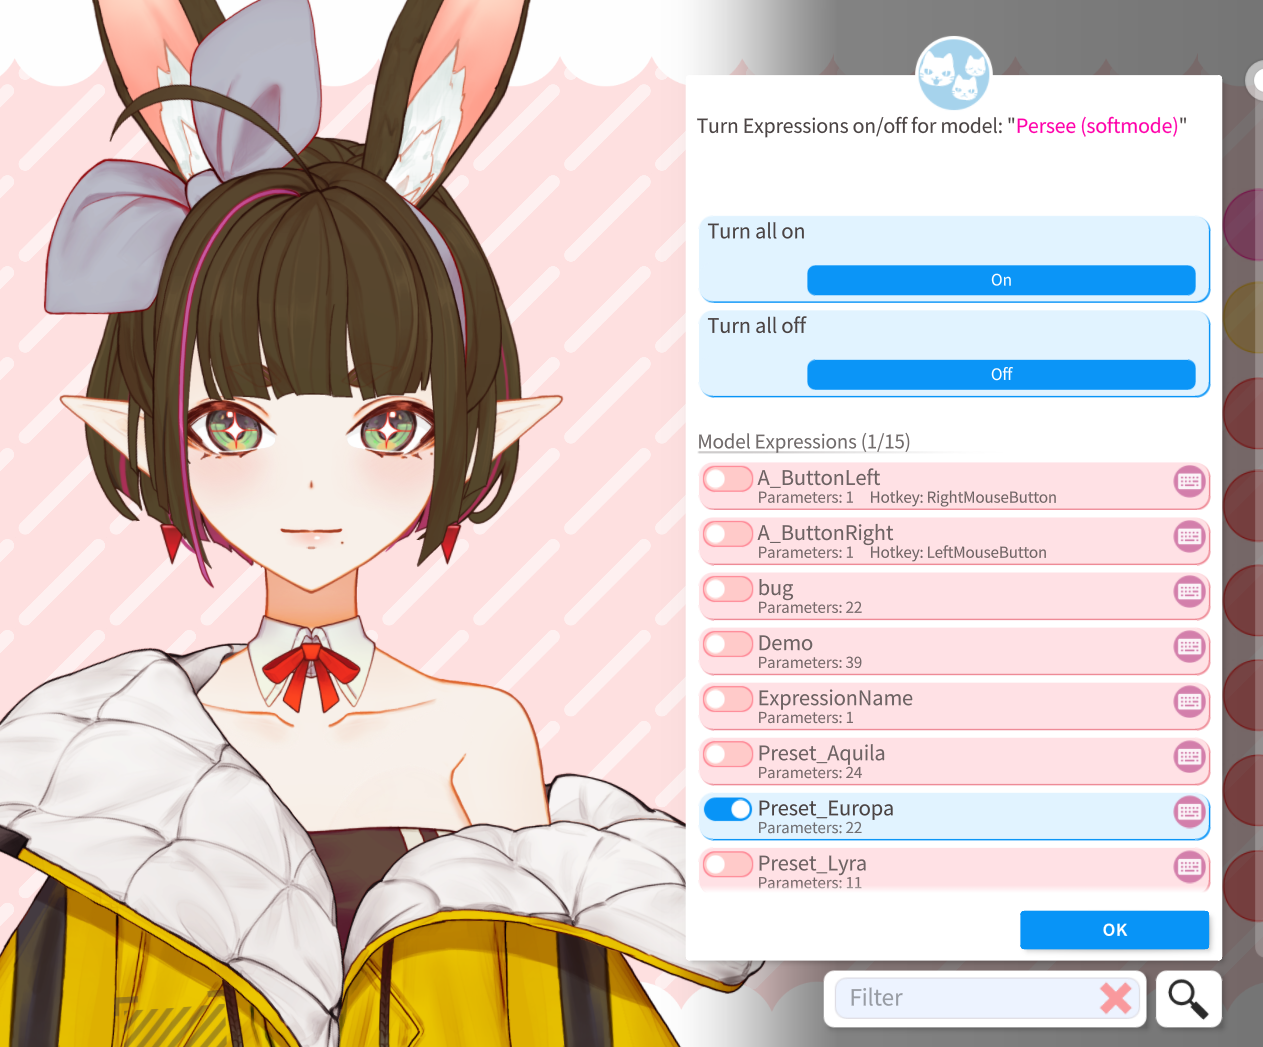
- After you save, you might notice that the model went back to the default. To enable your customized parts, click “Turn Expressions on/off”, and enable your new expression in the window that pops up. Vtube Studio should remember the active expressions next time you reopen the model.
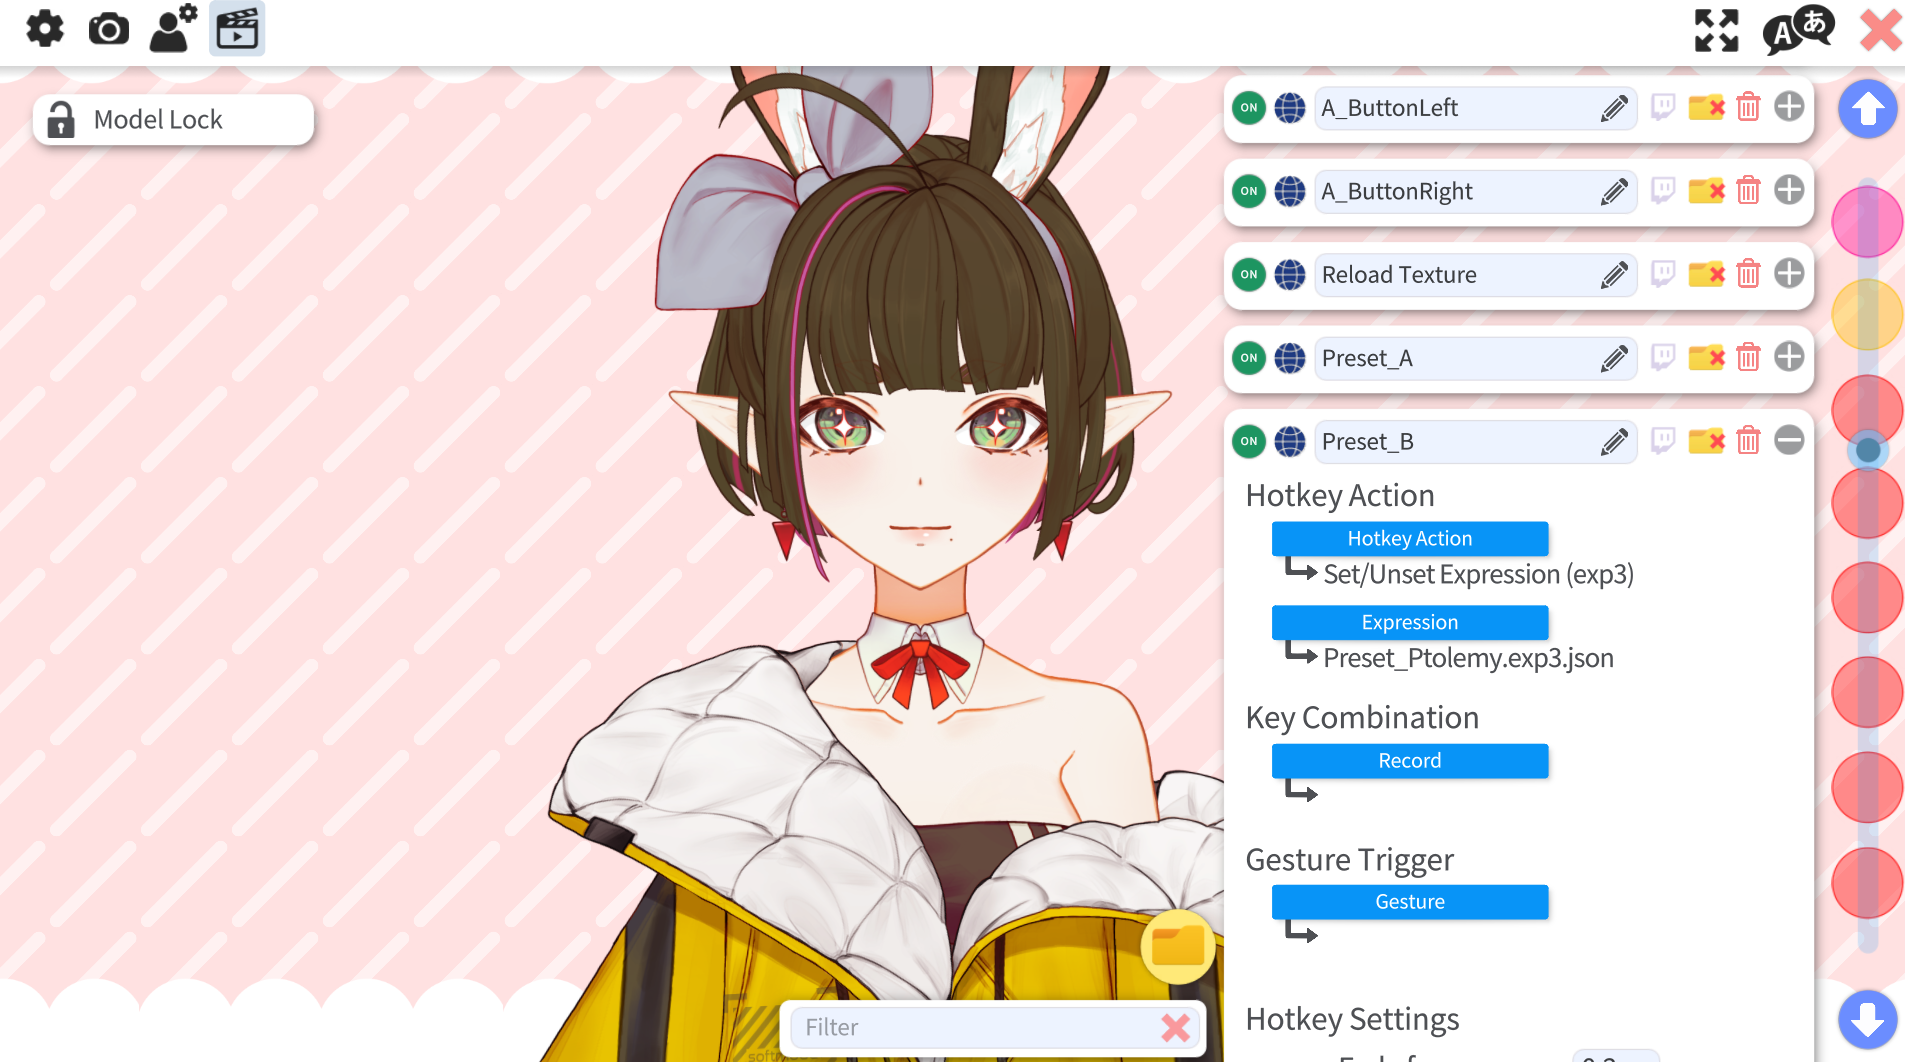
- If you would like a hotkey for toggling your preset, go back to Animation settings, expand one of the Preset_ fields, and change the Expression under Hotkey Action to your new expression.
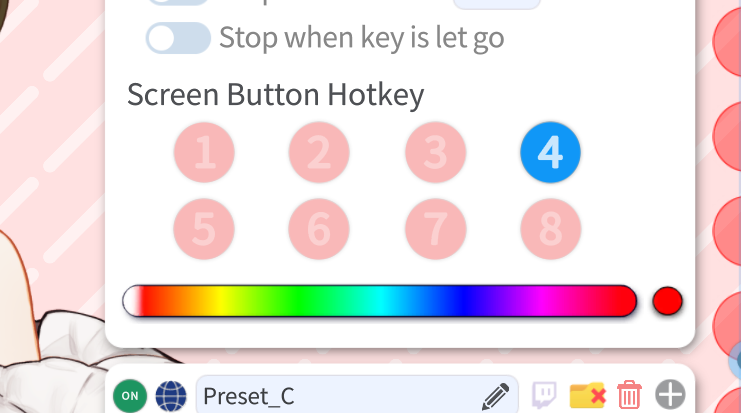
- You can also disable some of these buttons here by unchecking Screen Button Hotkey, if desired.
¶ Custom Colors in Vtube Studio:
- The most frictionless way to handle Persee’s colors is to do them inside Vtube Studio, using the Customize Model feature. However, this is not my recommended style because it is neither the best looking nor the fastest. Photoshop or Clip Studio Paint will more interesting color complexity.
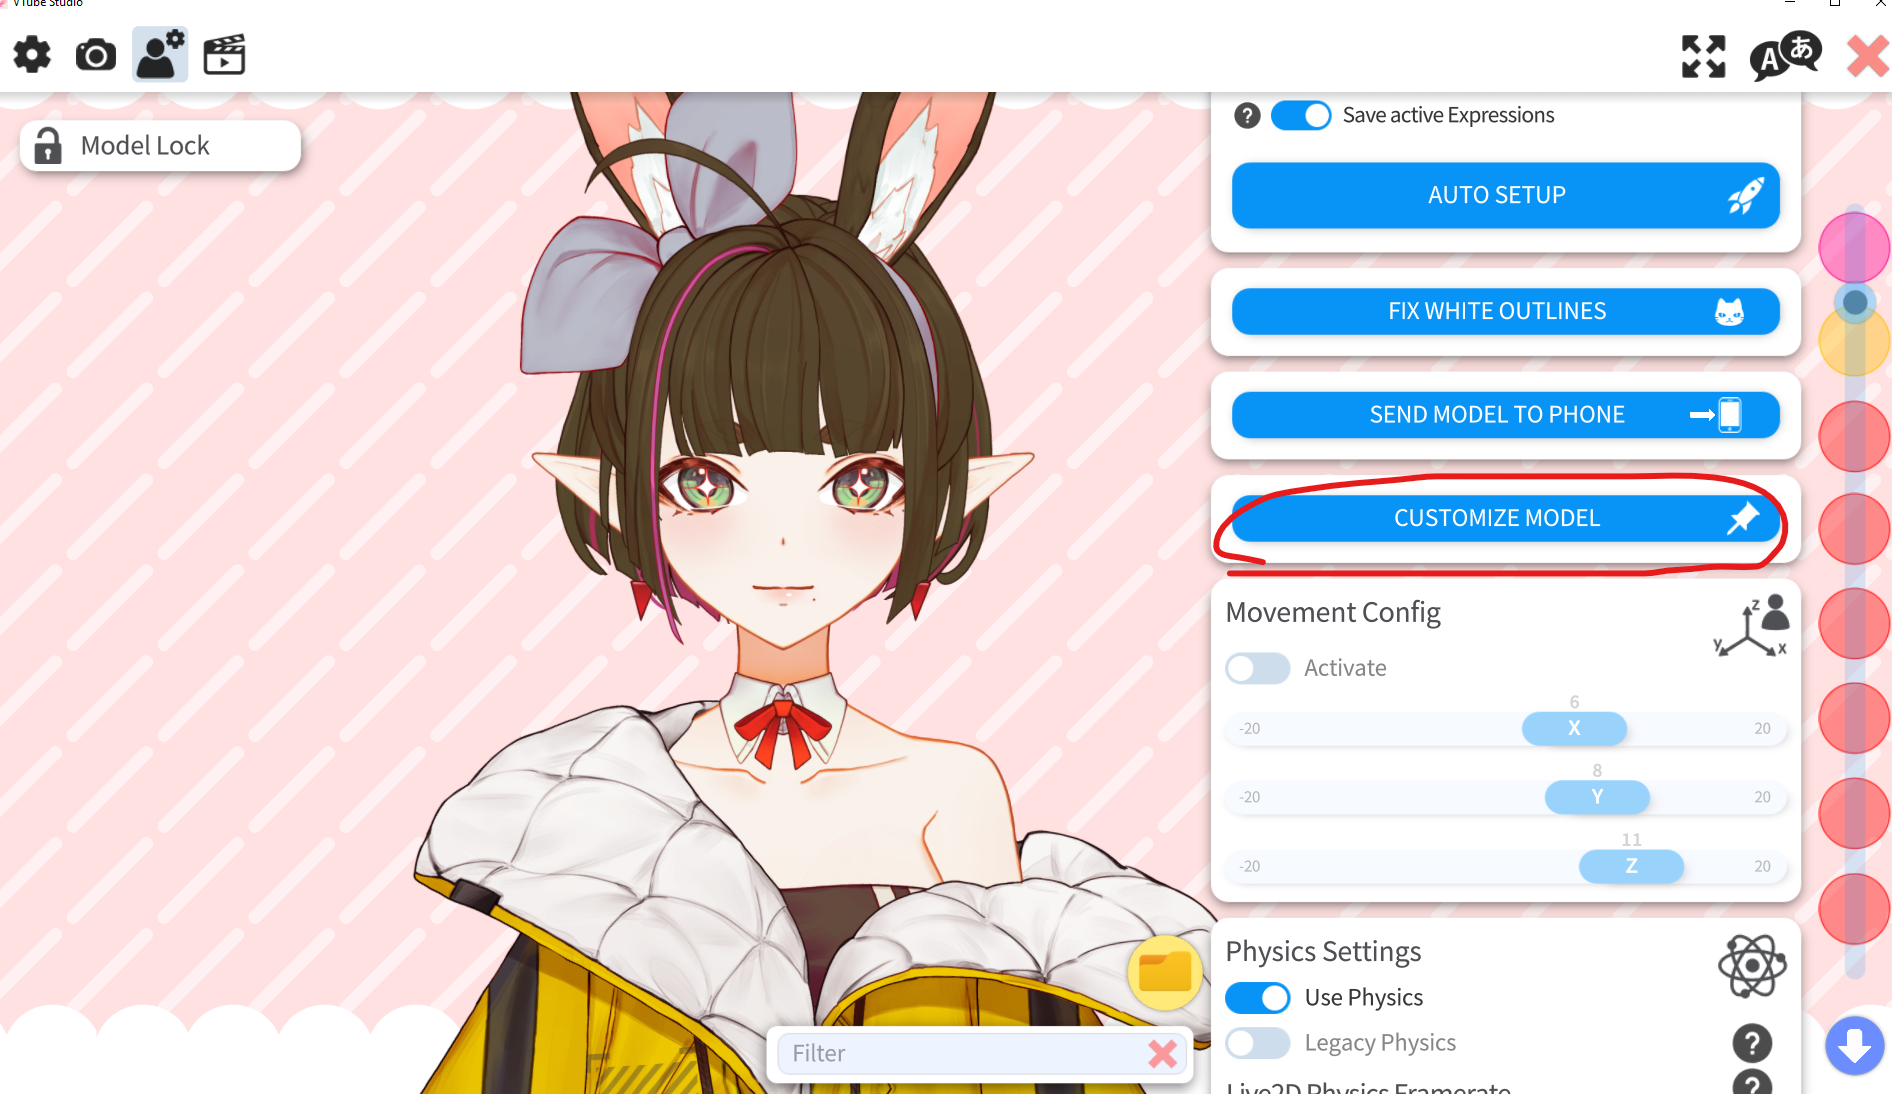
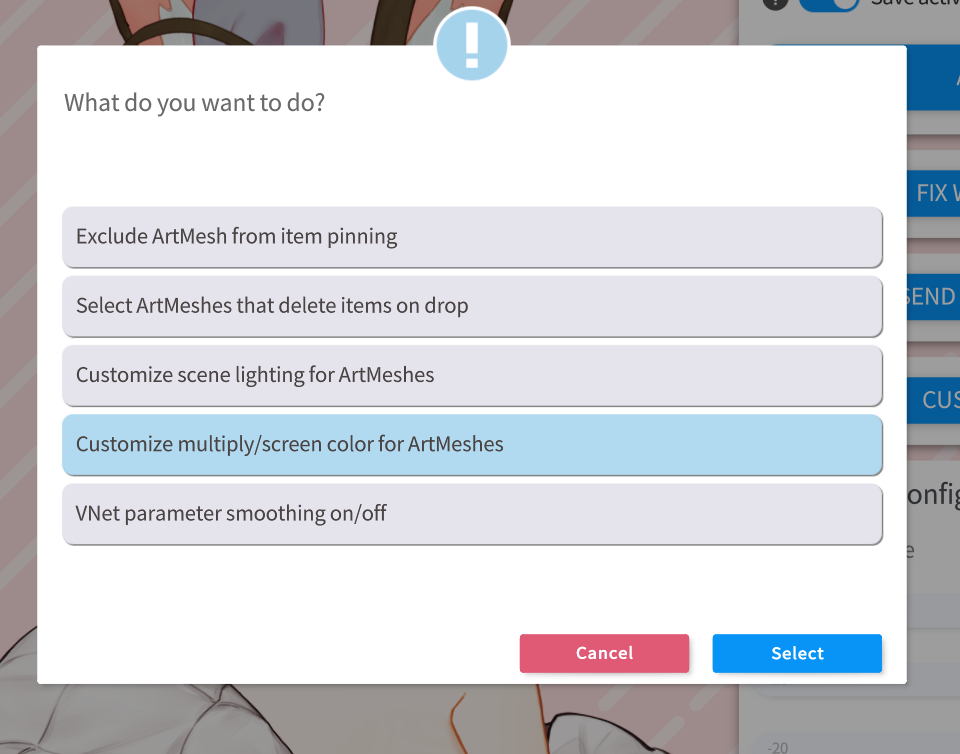
- Open the Model Settings, then click Customize Model. Click on Customize Multiply/Screen Color for Artmeshes, and click OK on the warning that shows up.
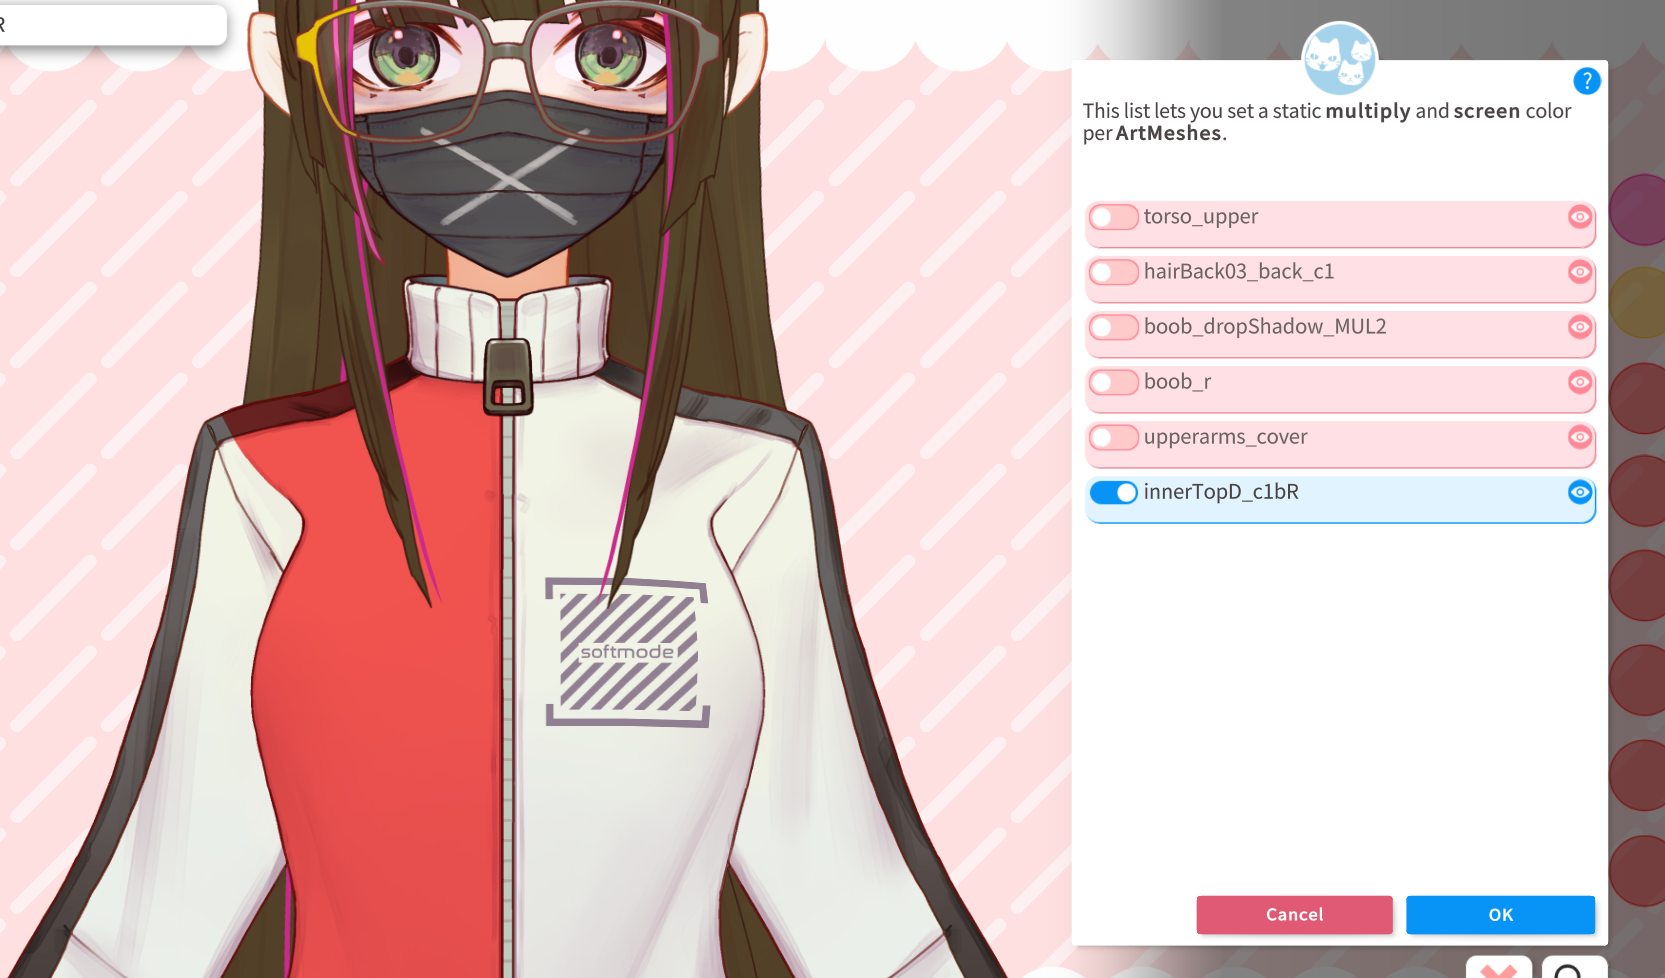
- Click on a part you’d like to color, and use the eyeball in the list that shows up to confirm the correct item is being selected.
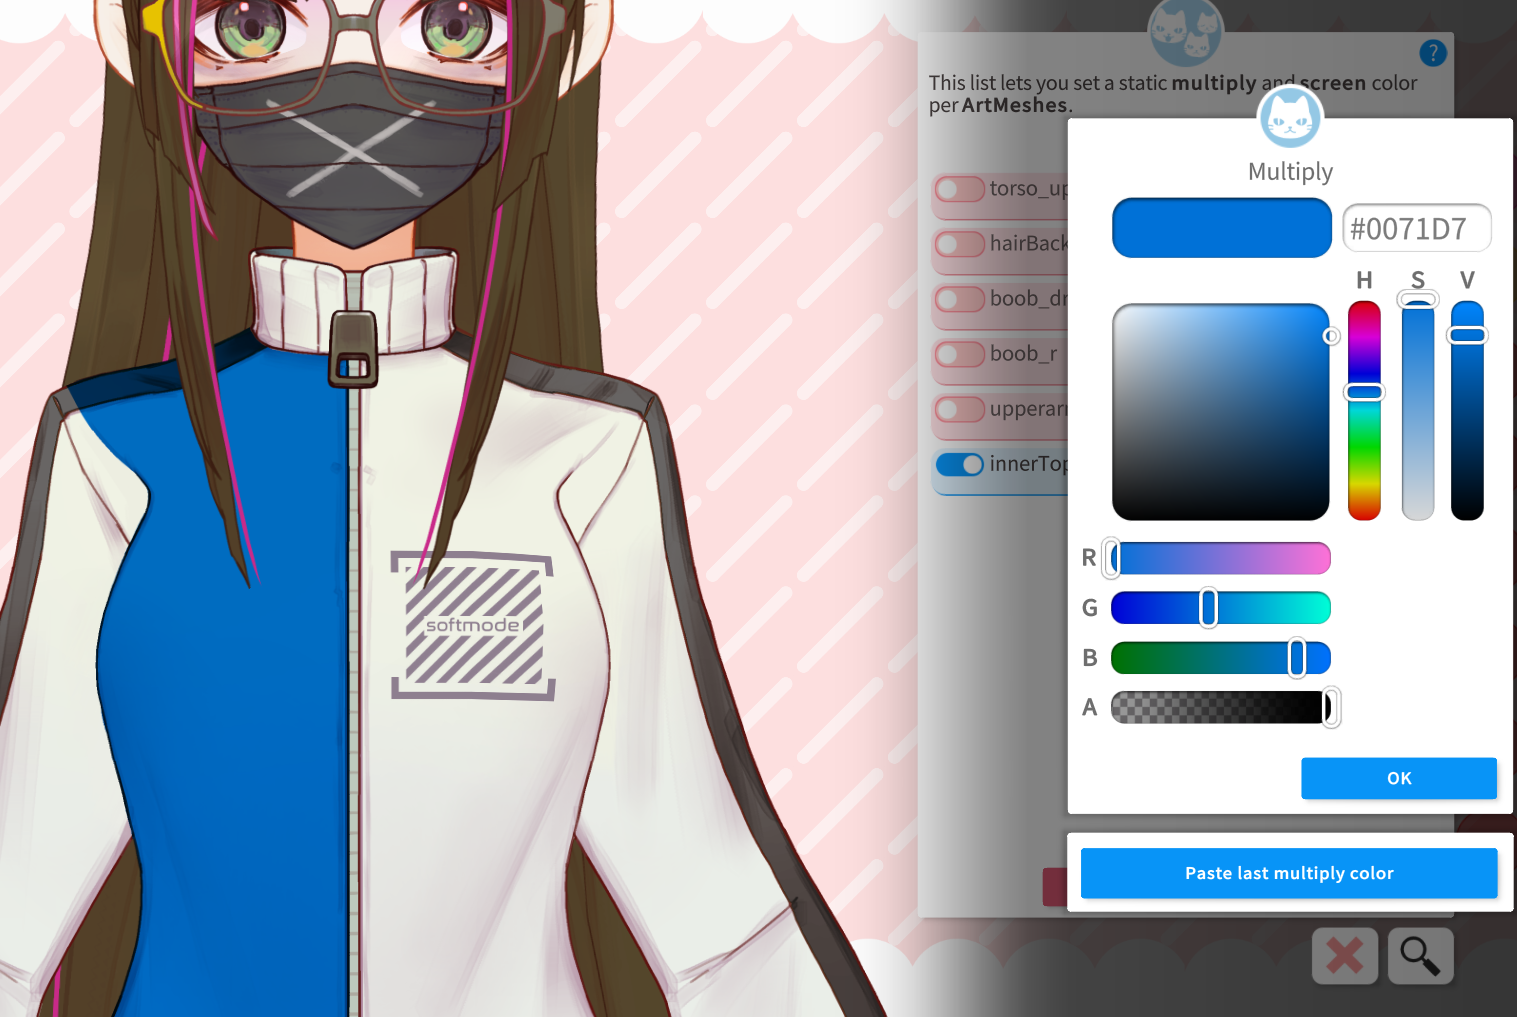
- Enable that artmesh using the switch to the left, and change the Multiply Color using the color selector. Press OK. On the window that pops up after, you can use the Screen color picker to lighten the artmesh.
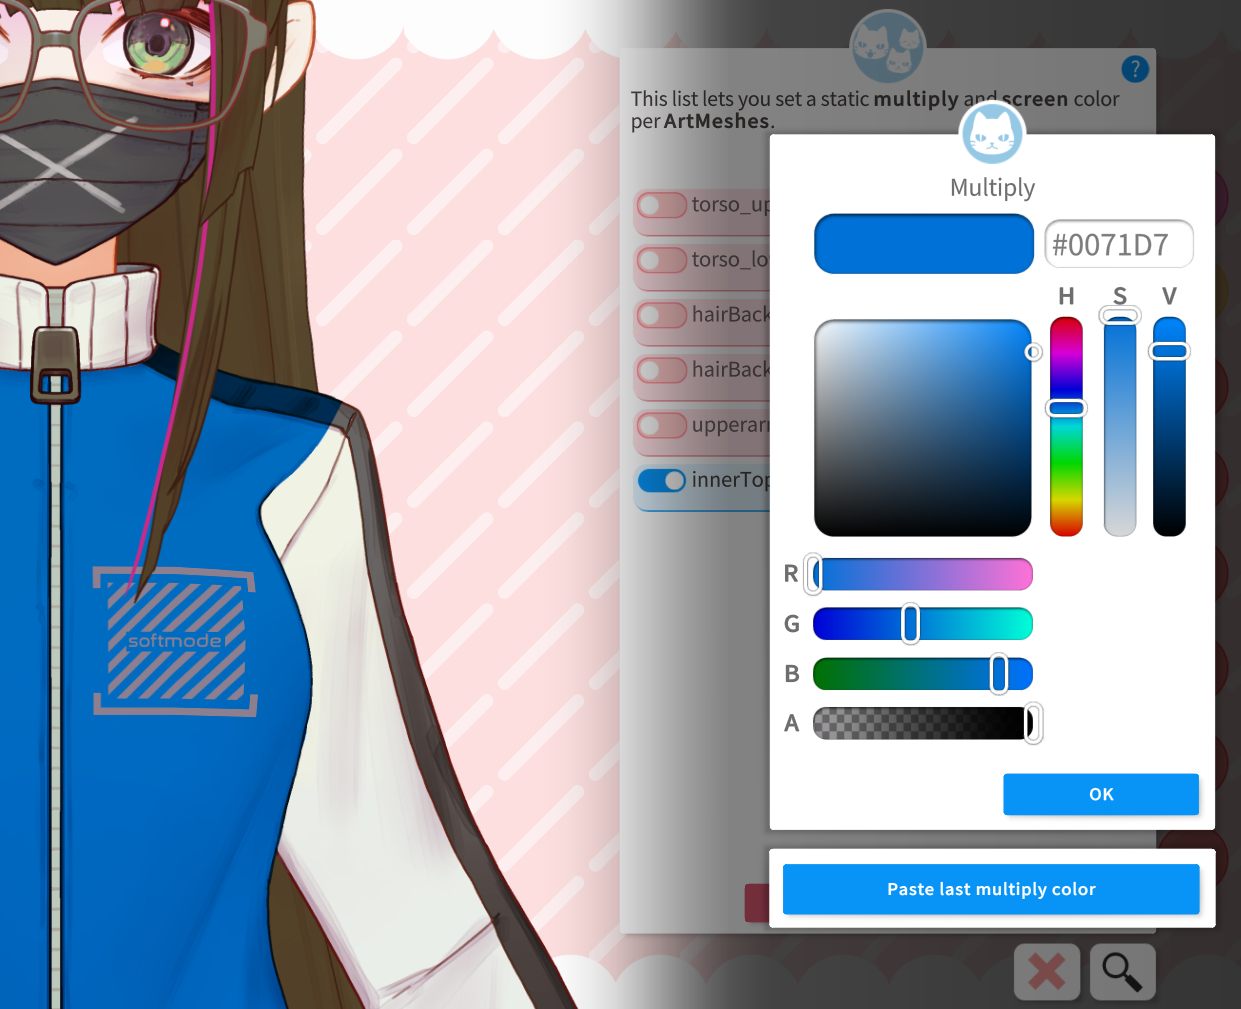
- You can now select a different part, enable it, and use the Paste last Multiply / Screen color feature to adjust multiple parts en-masse.
¶ Texture Editing Tips:
- Included with Persee’s download is a folder named Texture PSDs. These can be opened with any image editing program that can read .PSDs, including Photoshop, Clip Studio Paint, Photopea, and Gimp. How to edit images is outside the scope of this guide, but some tips and tricks when editing these textures in Clip Studio and Photoshop will be listed below..
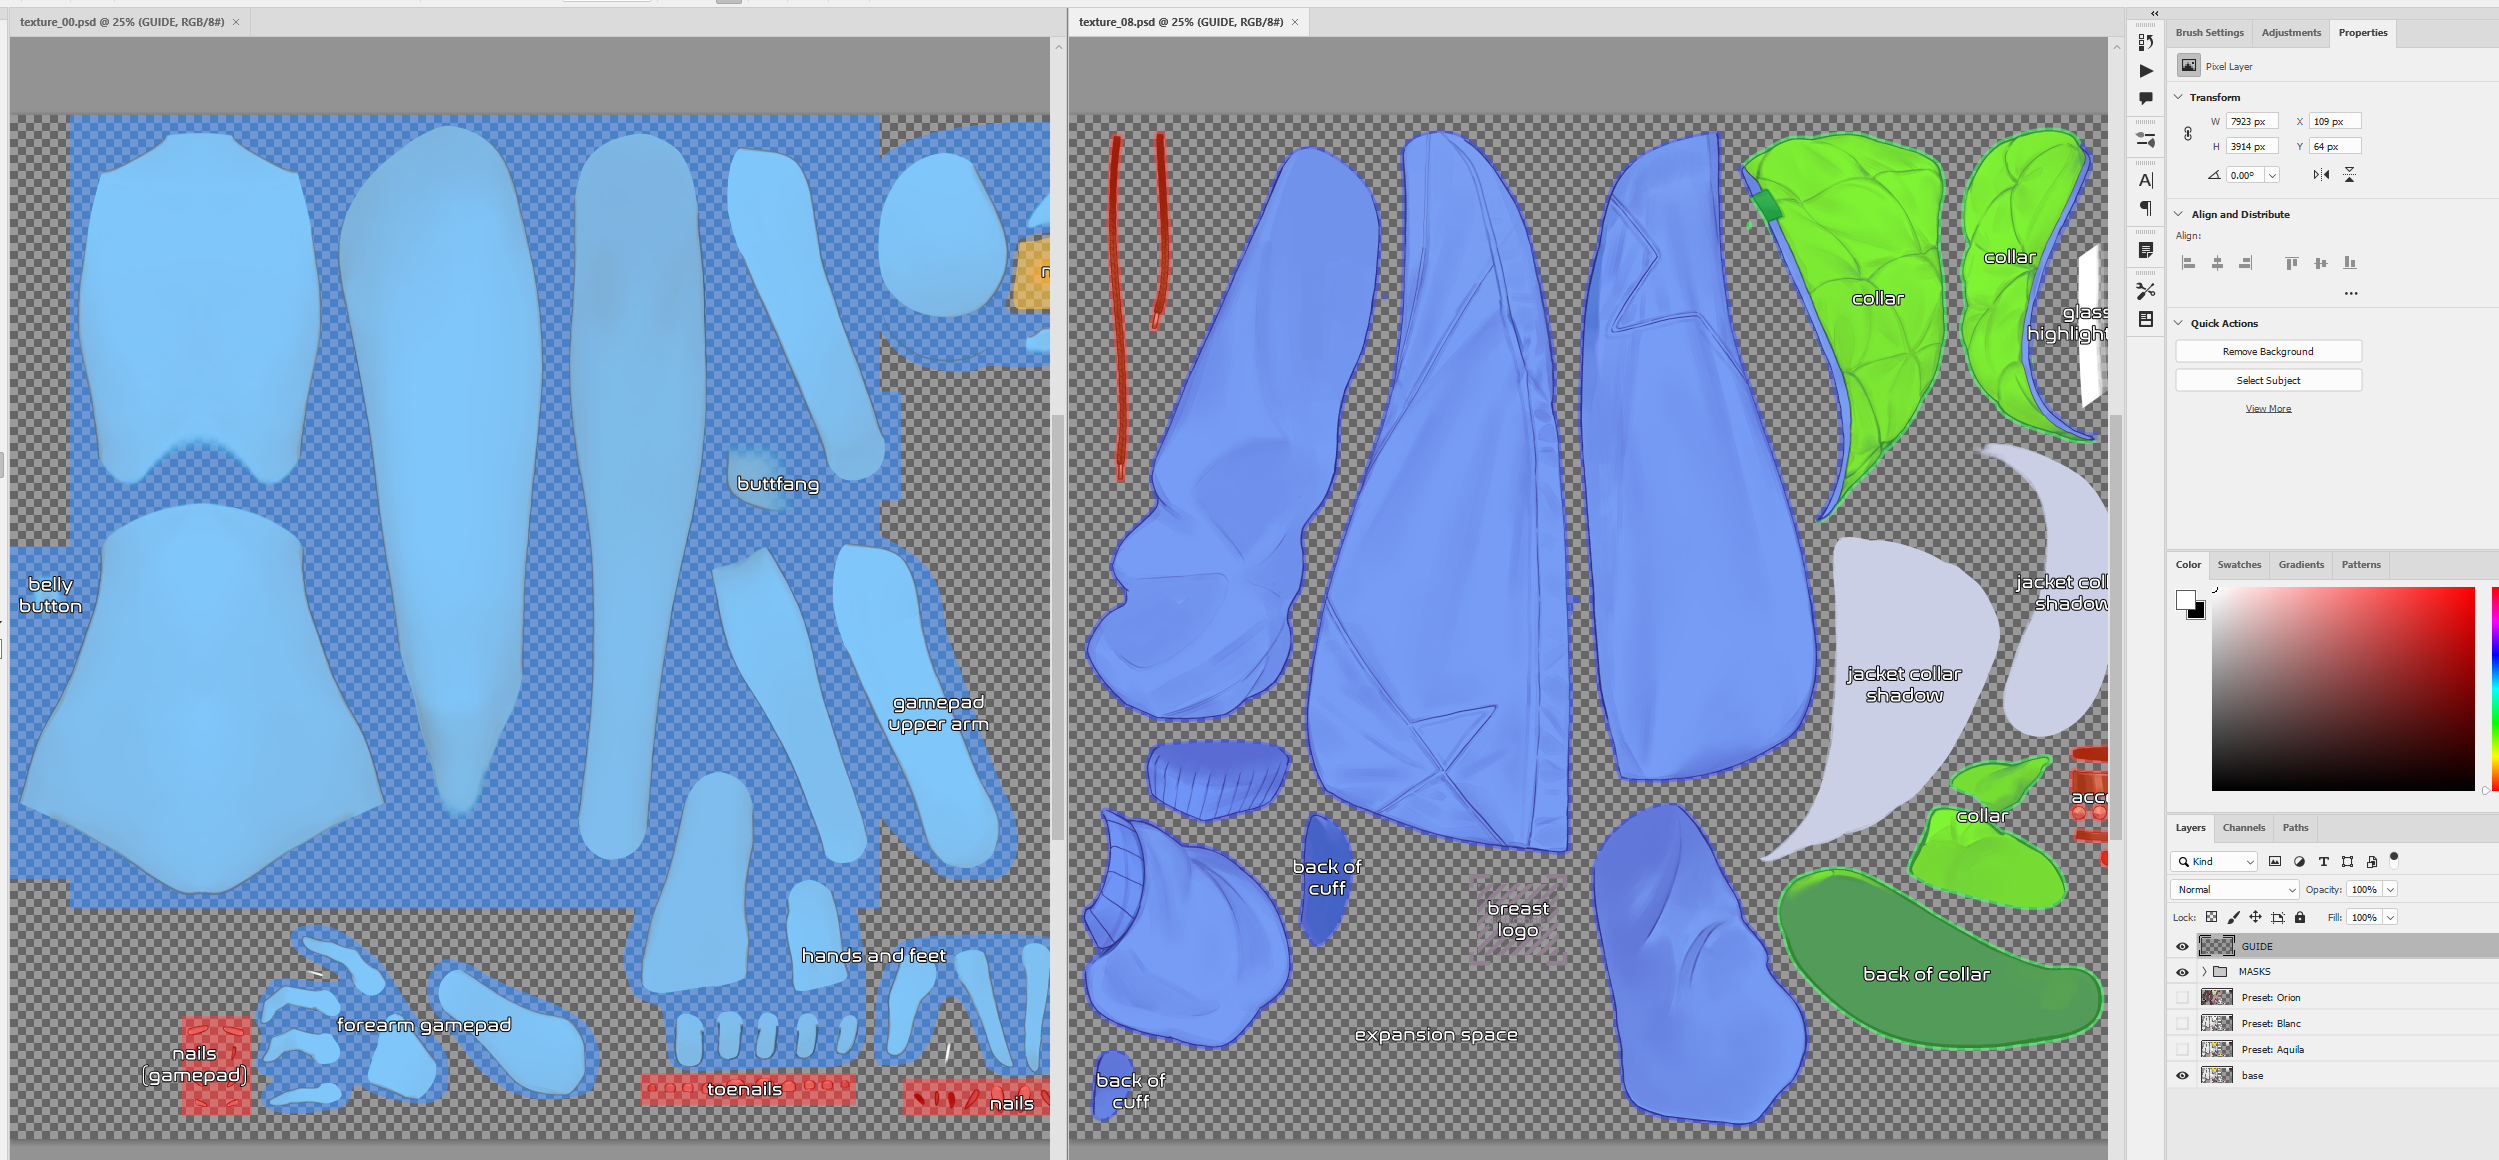
- Persee’s textures have been roughly organized by common use case - outfit parts that are designed together and more likely to be used together are on the same texture, which can help some textures not be loaded if they’re not needed.
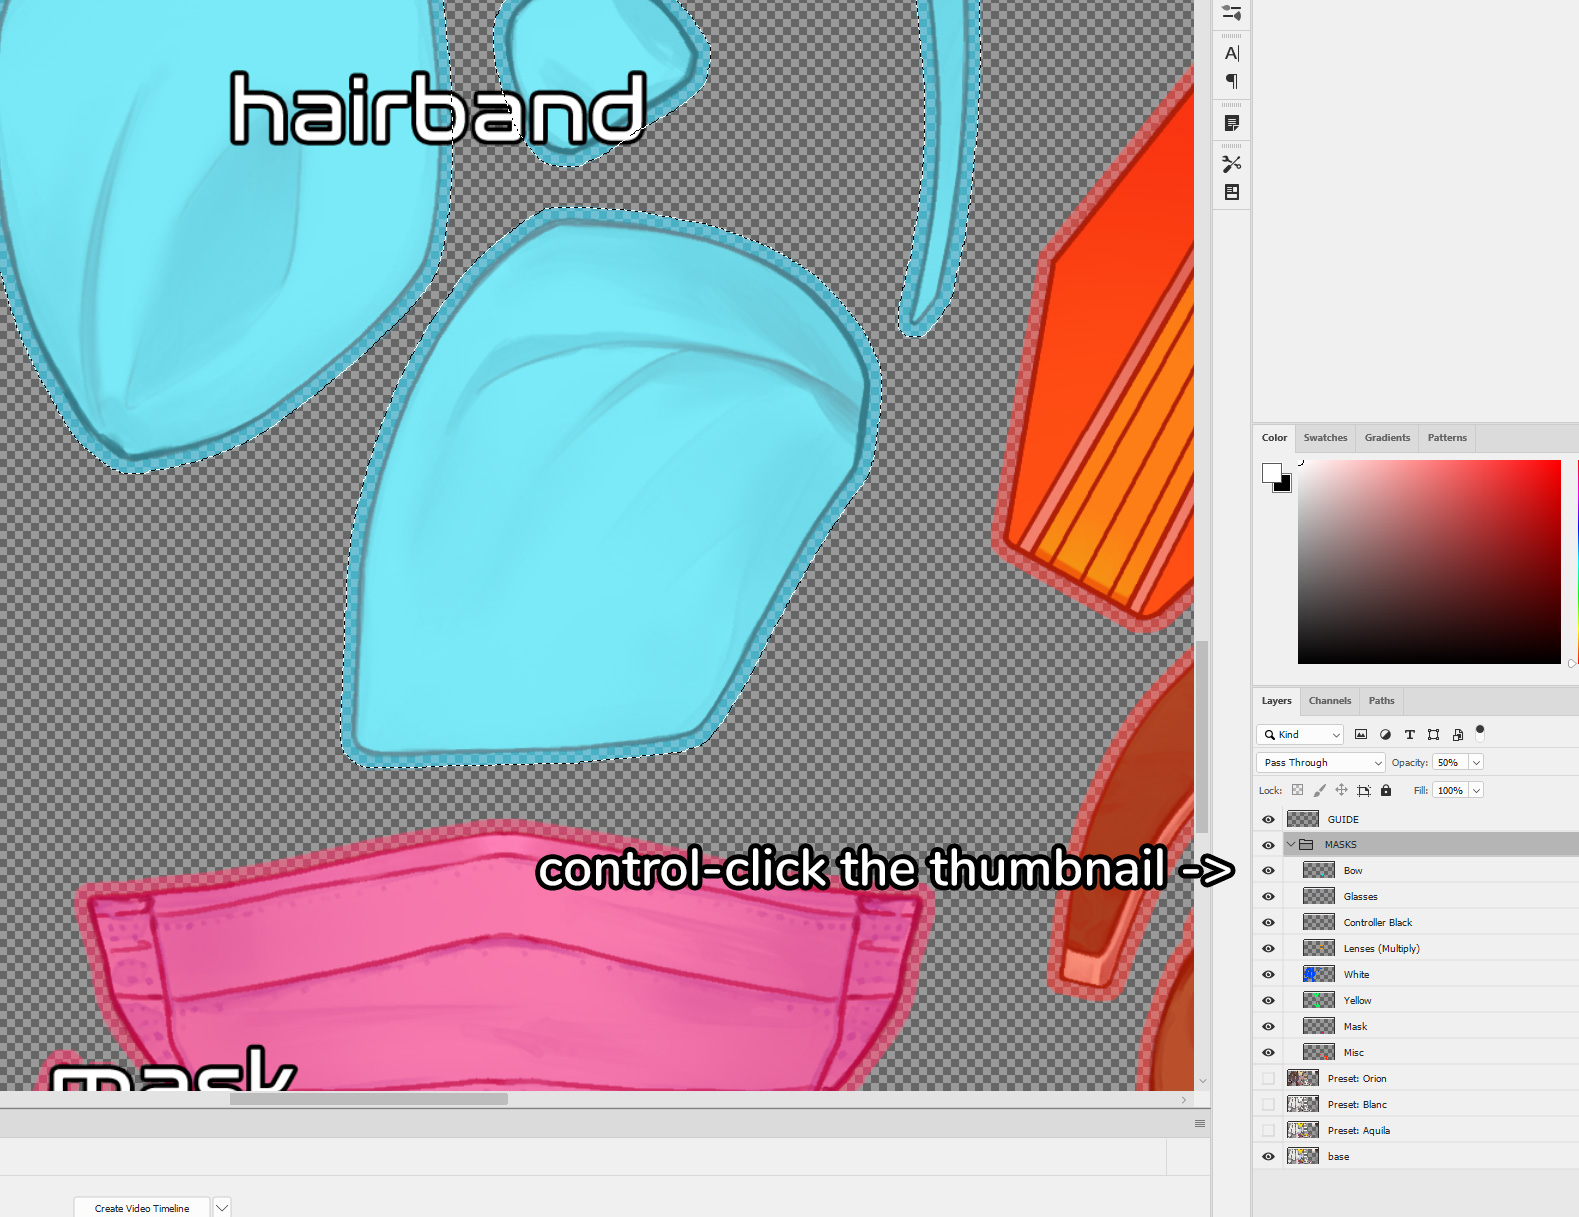
- When opening a texture PSD, you will see a Folder named Masks. Ctrl-Clicking the thumbnail for one of these layers will select the pixels of that layer. These masks are included in every texture PSD to save time selecting the most commonly edited color groups.
- If a mask doesn’t exist, Magic Wand can be used to select desired areas. For a perfect mask, expand the selection by 2 pixels, then feather by 1.
- In addition, the Guide layer will be visible by default. This is just an annotation layer to help find objects. Please turn this layer and the Masks group off before exporting, or the model might look broken.
- When creating a new color preset, it is recommended to duplicate the Base layer and put it in a group, then clipping new adjustment layers to the new layer so it retains the transparency. Hide the base layer after you create your duplicate.
- After finishing editing a texture, save it with the same filename as a PNG somewhere, then drag it into Vtube Studio’s Live2DModels folder, overwriting it. Then press the yellow button in Vtube Studio again to reload.
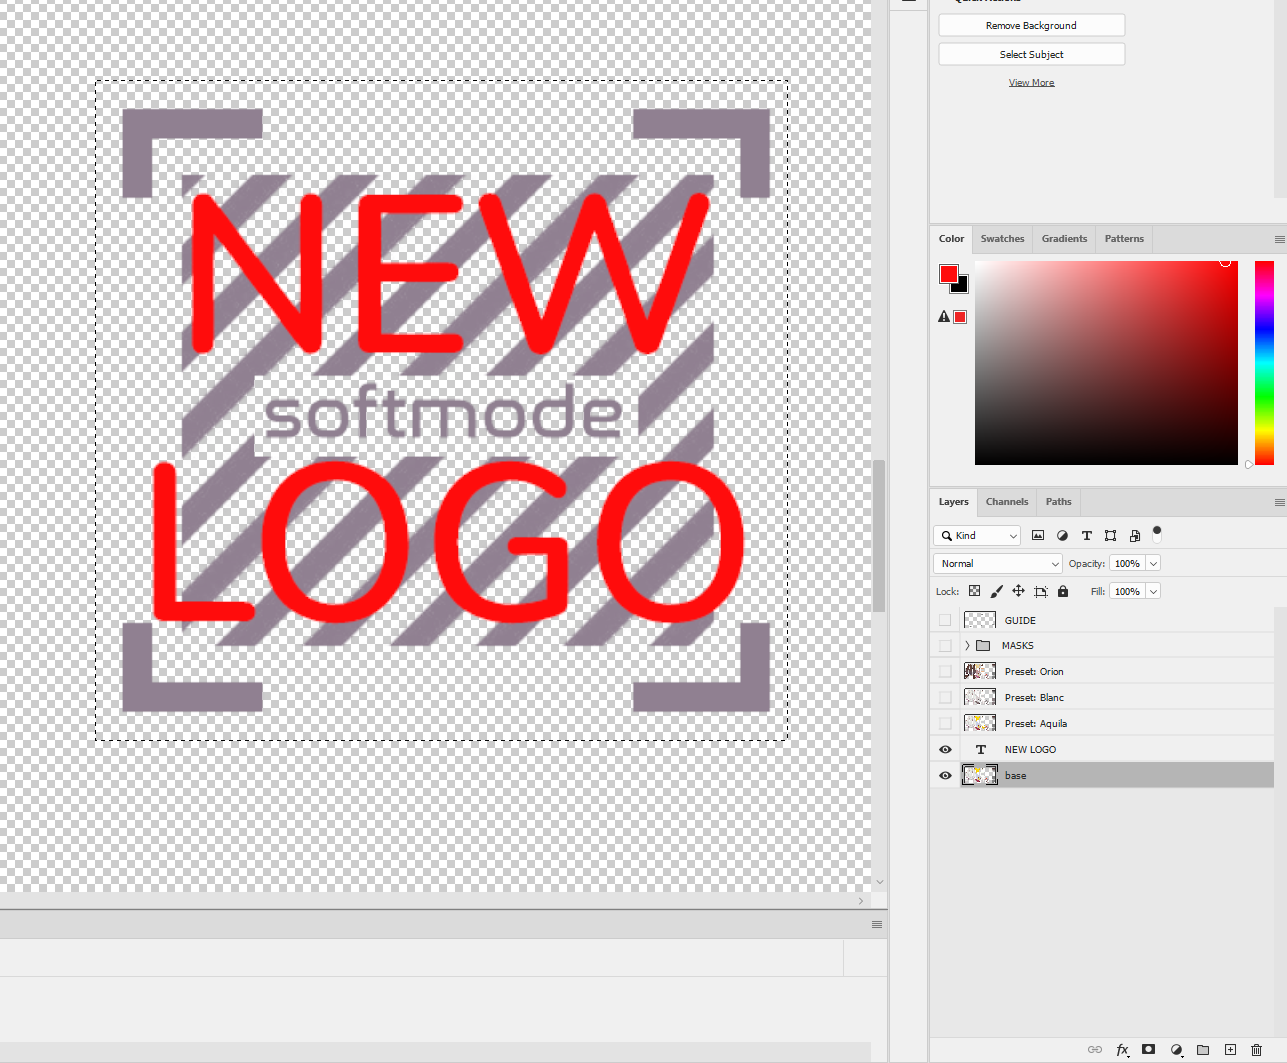
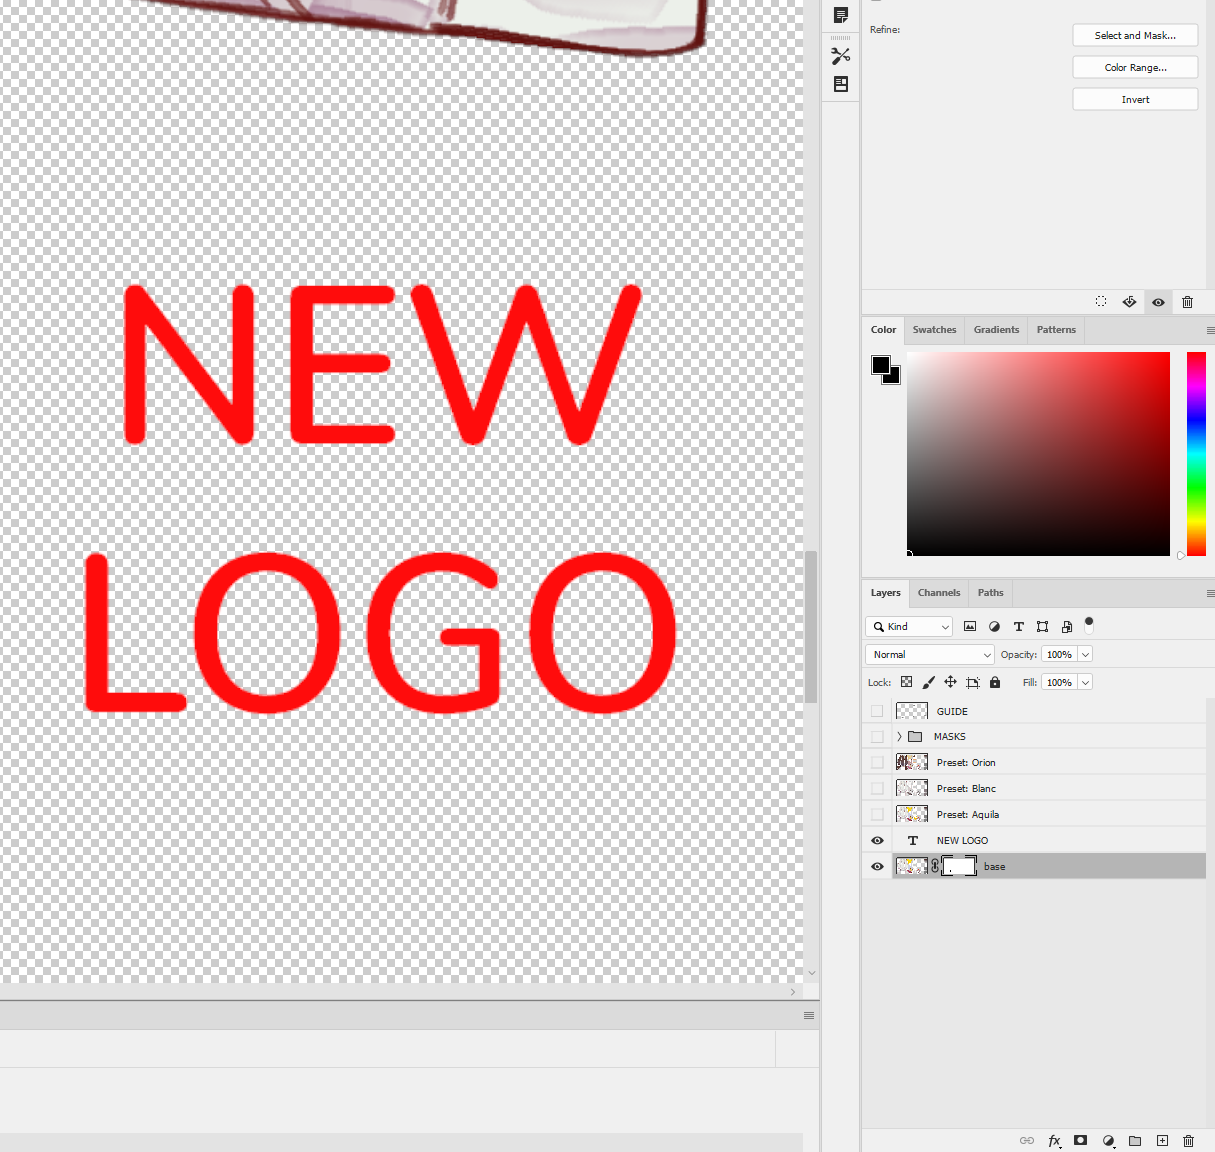
- To change the logos on some of the outfit items, you can place an image inside the rectangle area where the placeholder logo resides. You then hide the base layer’s placeholder logo with a mask.
¶ Texture Editing Tip for Clip Studio Paint:
- In Clip Studio Paint, I usually use the Tone Curve correction layer to adjust values, then a Multiply, Overlay, or some combination of layers with a solid color to change the color of objects.
I generally don’t use Clip Studio’s Gradient Map because it doesn’t preview the colors as you’re editing it.
¶ Texture Editing Tip for Photoshop:
- In Photoshop, much of the same techniques apply, except Photoshop has some tricks that are unavailable in Clip Studio.
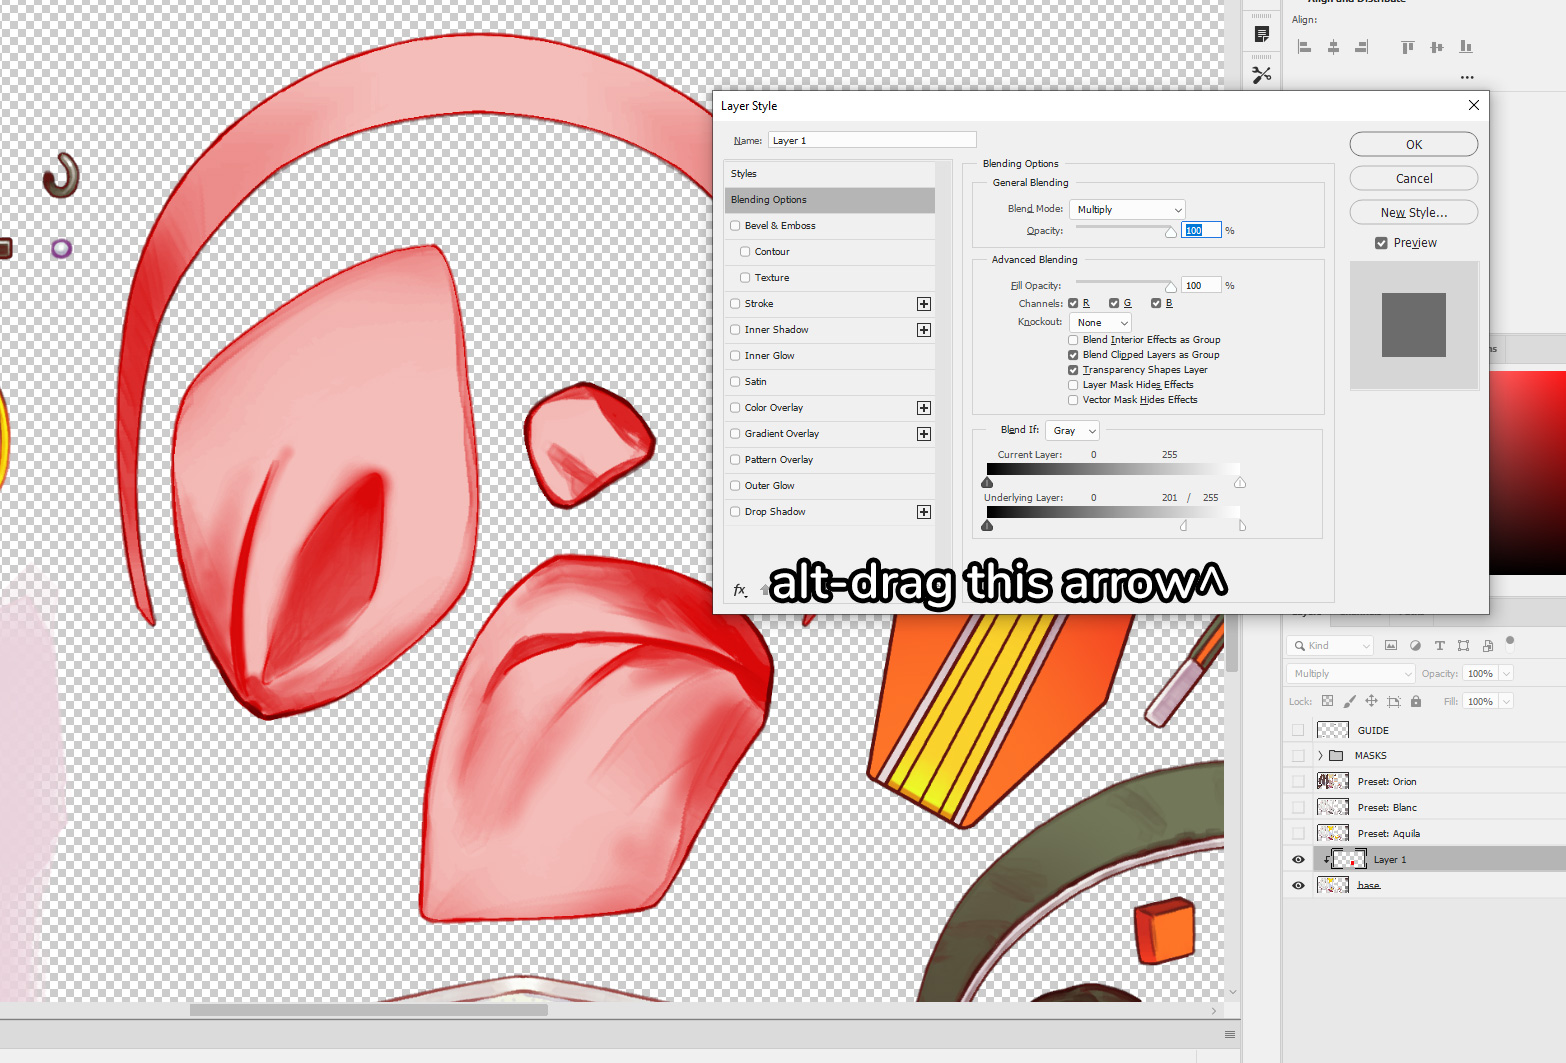
- With any layer, if you open the layer’s Blending Options, you can drag these arrows on the bottom right to change the opacity of the layer based on the lower layer’s brightness. Alt-Dragging the arrows will split the arrows and allow it to blend gradually. I will often use this technique to blend a layer just in the shadows or just in the highlights, which allows for more color complexity.
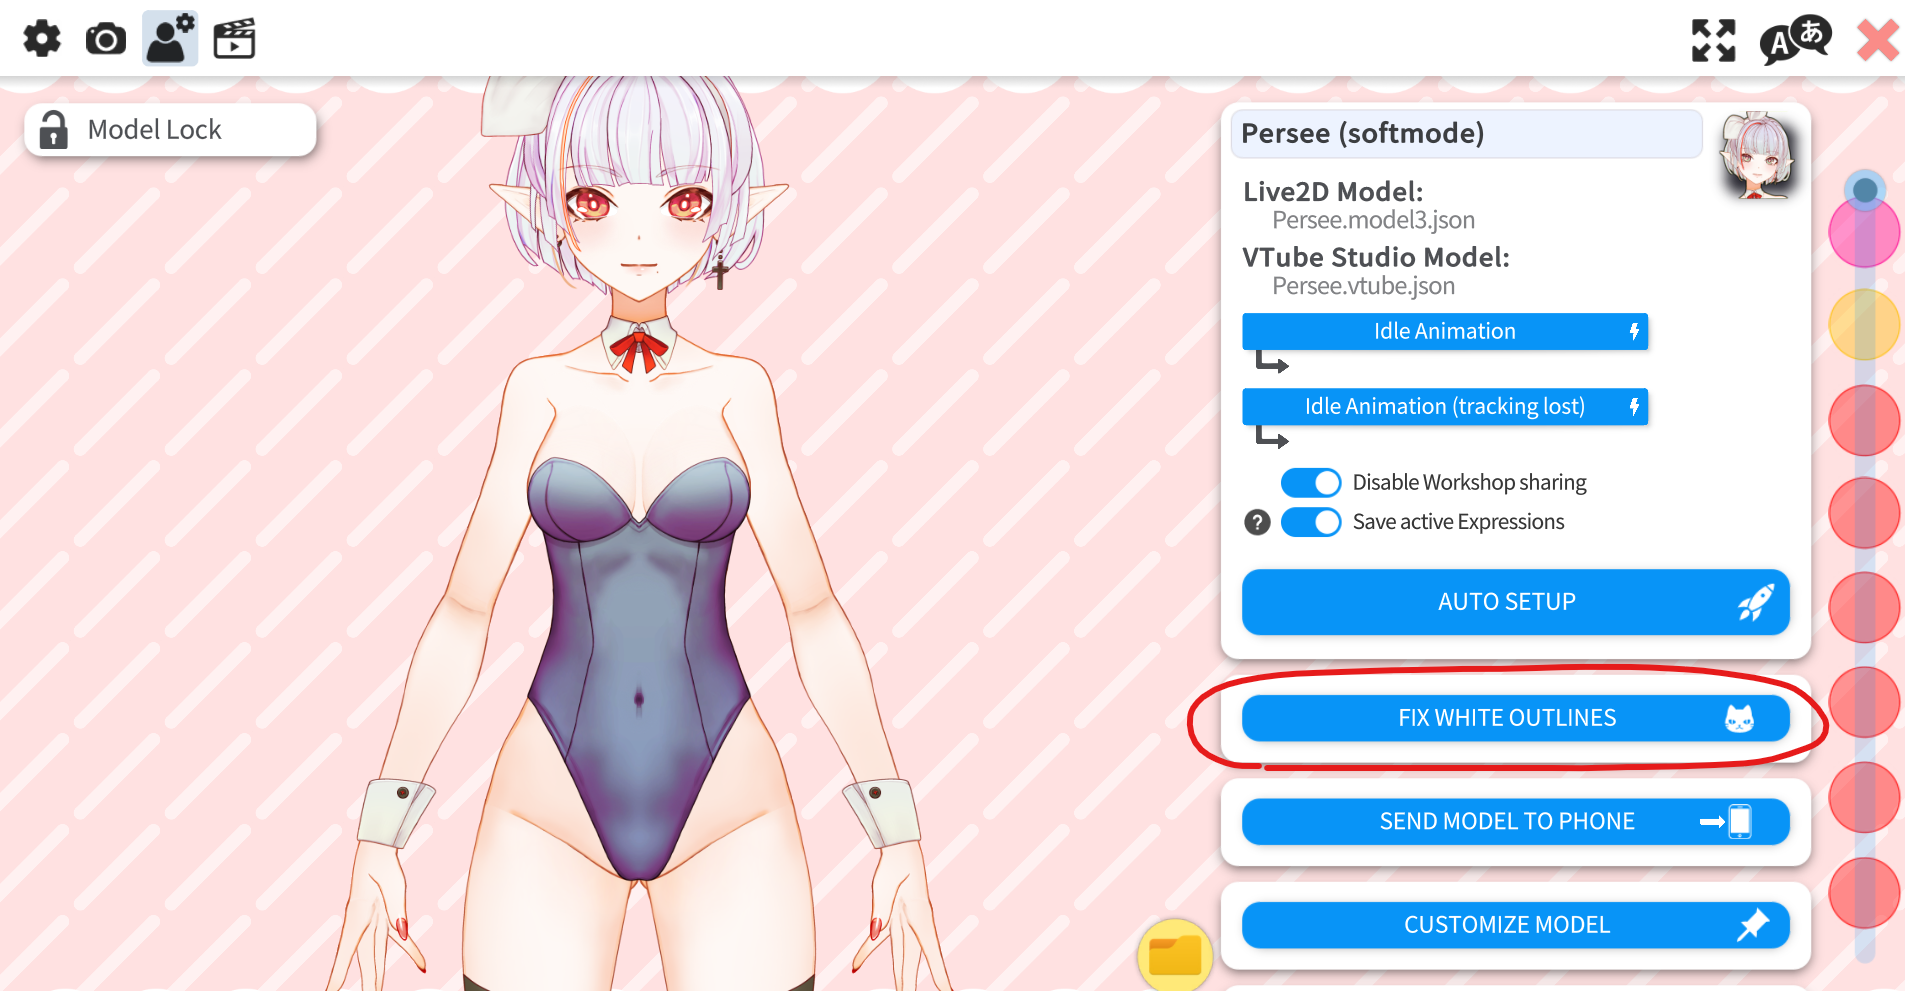
¶ Fixing White Outlines
If you get small white outlines after editing a texture and re-importing, open the Model Settings in Vtube Studio, then click “Fix White Outlines.”
¶ Tips and Tricks
Here are some Tips & Tricks that might help when using Persee.
¶ Simplified Body Lean:
Depending on your tracking environment or mannerisms, you might want Persee’s body to lean with the head angle, instead when you move left and right in your chair.
- To do so, go to Vtube Studio’s Model Settings, and expand the Body Rotation Z Parameter.
- Important: Before the next step, take note of the Input numbers, as Vtube Studio will erase them when you change the Input Parameter
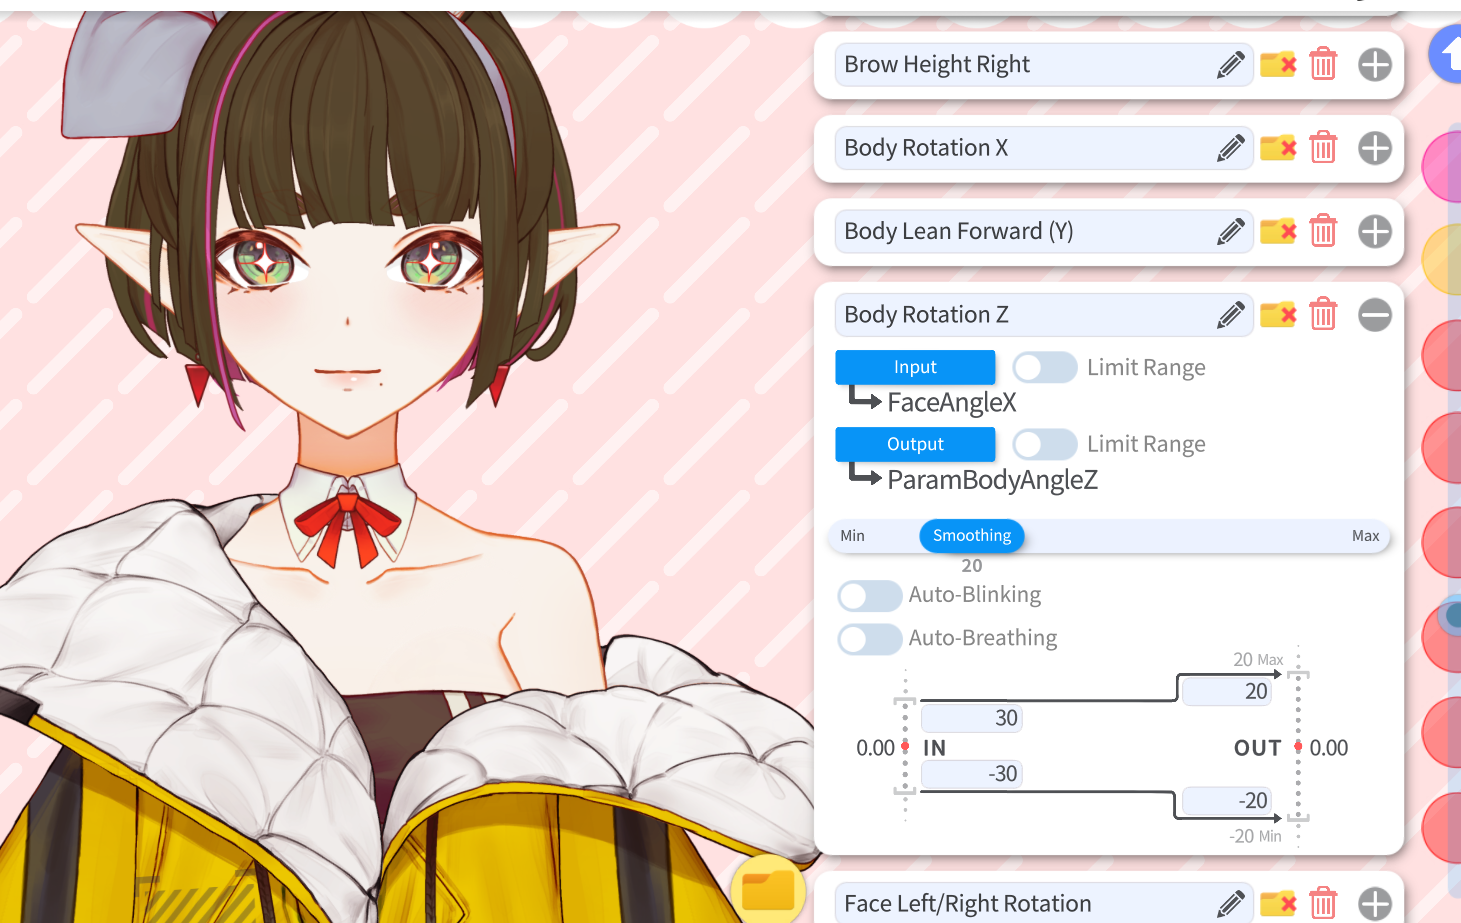
- Change the Input from FacePositionX to FaceAngleZ.
- You’ll notice the Input Range has changed. Adjust the In numbers until desired movement is achieved. If you’d like to flip the direction, swap the negative number to the other field.
¶ Expanded Lean Forward:
- Persee can actually lean back a bit if you move your head further away.
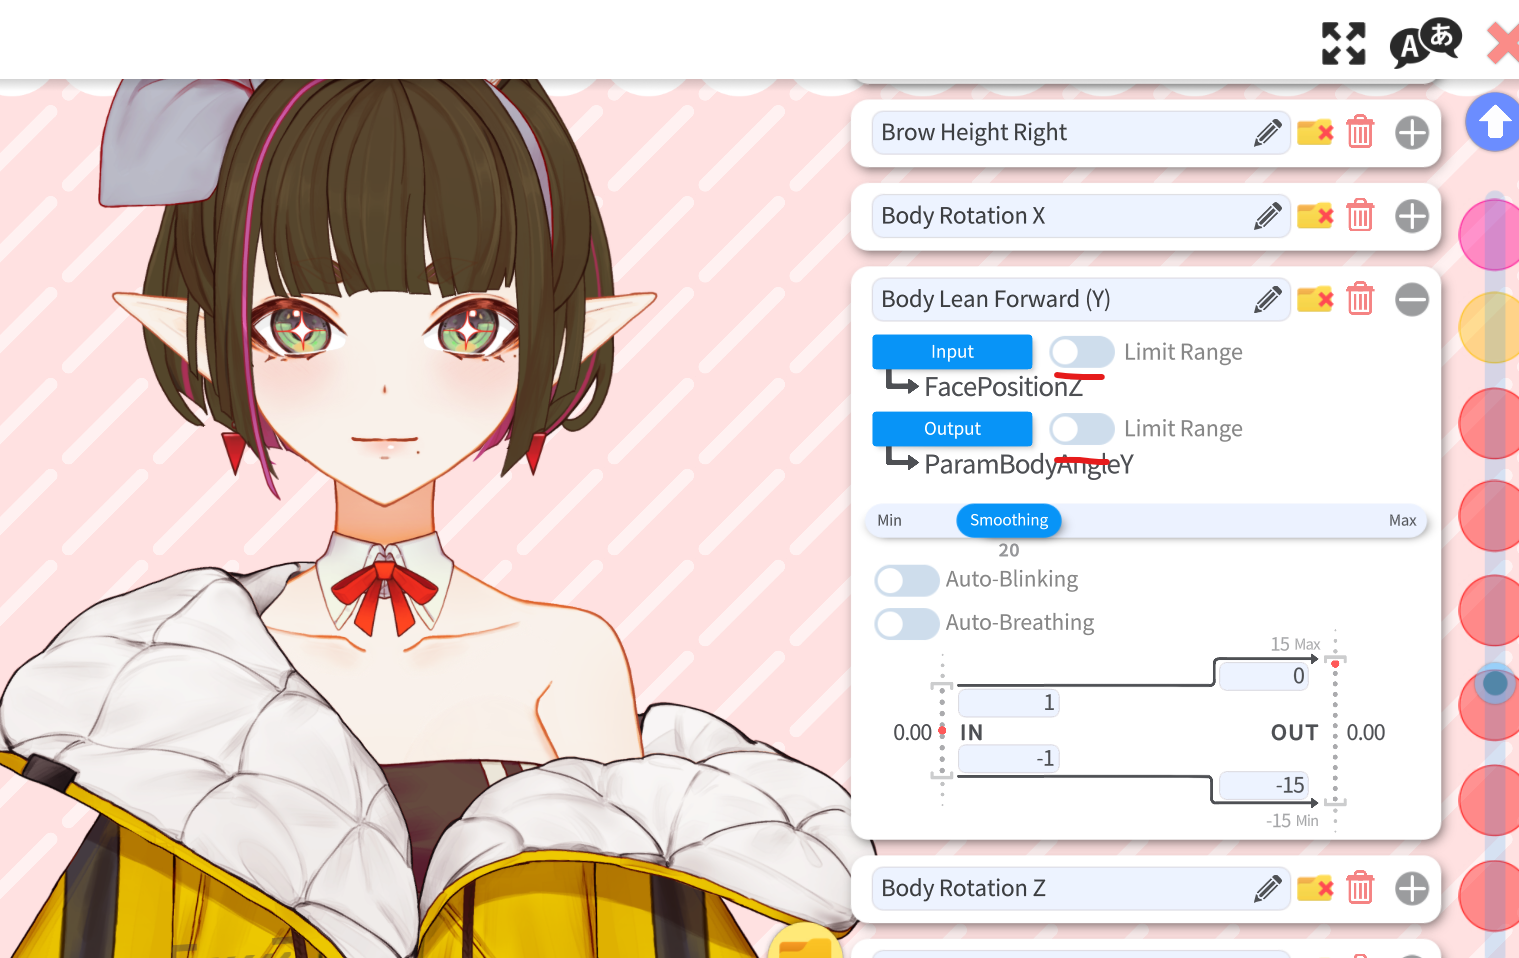
- To enable this, go to Vtube Studio’s Model Settings, expand the Body Lean Forward (Y) Parameter, and uncheck “limit range” on the input and output.
- Examine the number to the left of the input range, and adjust the numbers until Persee leans back when you do.
This feature is usually disabled because most streamers will be sitting in a chair, and you can’t lean that far back. If you choose to enable this, it can add a little more movement to your model.
¶ A Note On Nudity:
For maximum versatility, it is possible to make Persee Not Safe For Work, as the parts are rigged on top of a fully rigged nude body. This will obviously violate the Terms of Service of some platforms, so I cannot stress this enough: Please-be very
careful when streaming the customization process of her clothes. Any parameters that are clearly Not Safe For Work will be marked with a R18_ prefix.
¶ Patching / Updates
If there’s an update to Persee, this is how you patch your own copy.
- Close Vtubestudio if it’s open, or change to another model in Vtubestudio.
- Navigate to your Vtube Studio’s Live2DModels/Persee folder and make a copy of the Persee folder just in case.
- Copy the following files to your Live2DModels/Persee folder, overwriting them:
- Persee.cdi3.json
- Persee.moc3
- Persee.model3.json
- Persee.physics3.json
Important: Leave Persee.vtube.json alone, or your tracking parameters, hotkeys, and various other Vtube Studio settings might be lost. This is why it’s important to keep a backup of your Persee folder.
- Copy over the correct textures as needed. If you’ve made custom changes to the textures in an image editing program, you might need to merge the sheets manually.
In general, future updates to textures will aim to keep existing textures alone, and only add parts in the Expansion Areas to maintain compatibility. I will aim to keep the changelogs easy to read, so please refer to them to ensure your customizations don’t break.
A detailed texture patching tutorial will be created as soon as it is relevant.
¶ VBridger Setup
Persee supports VBridger for extended expressions on the mouth. This part isn’t exclusive to Persee, but it's included for convenience.
- On your iPhone/Ipad, open the VTube Studio App, and go to Settings.

- Scroll all the way down, and activate “3rd Party PC Clients”.
When I first used VBridger, I forgot this step and was stuck for a while.
- Click on “Show IP list”, and make note of the IPv.4 number. You’ll need this in VBridger later.
- On your computer, launch VBridger and on the bottom left, select “VTube Studio” from the dropdown box.
- To the right of the dropdown, type the IP address you saw earlier on your phone. Click “Connect To Iphone”, and you should see Bridget in the VBridger window move.
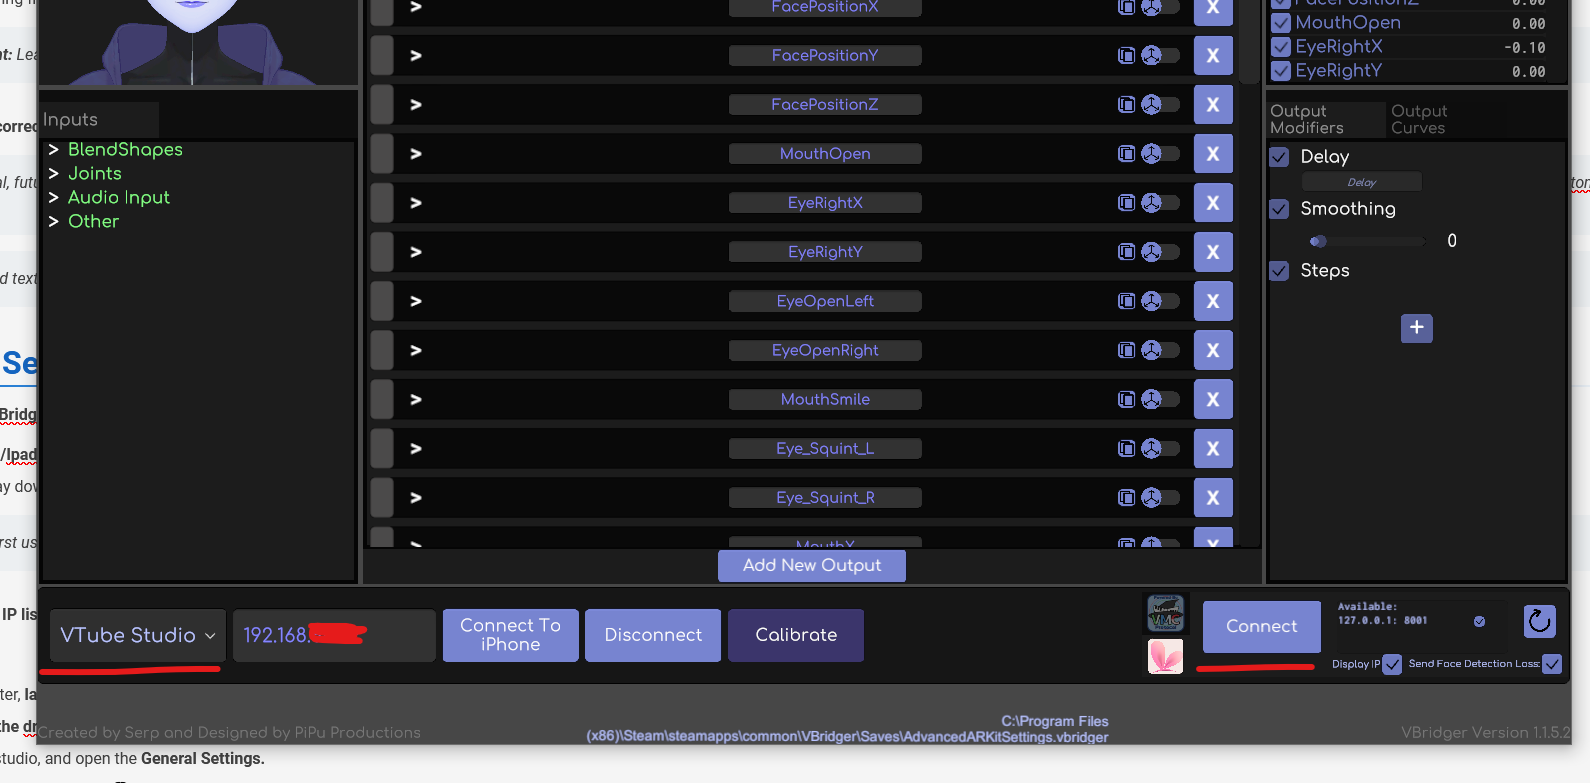
- Launch Vtube studio, and open the General Settings.

- Scroll down to the “VtubeStudi⚙️ Plugins” section and enable “Start API”.
- In VBridger, click “Connect” on the bottom right.
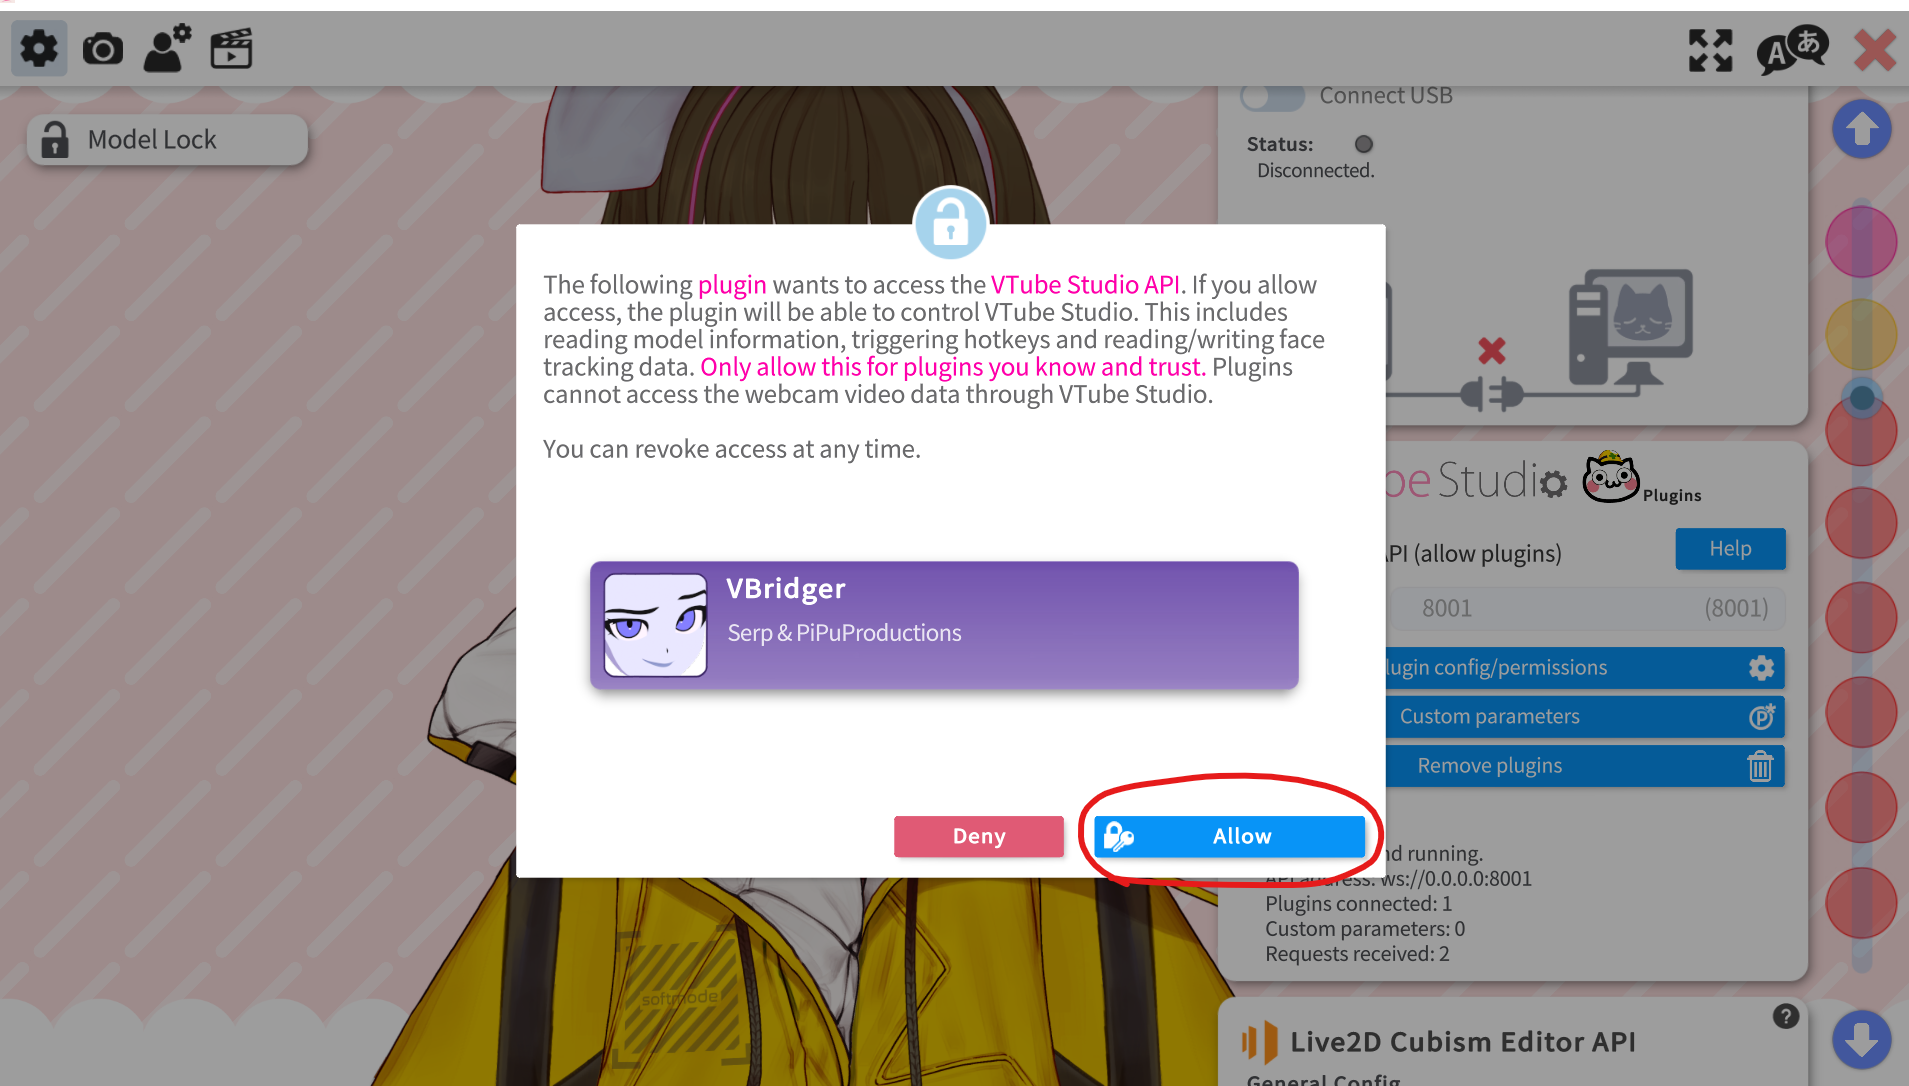
- Return to Vtube Studio, and a popup should appear, requesting permission. Grant it permission, and VBridger should now be connected to Vtube Studio.
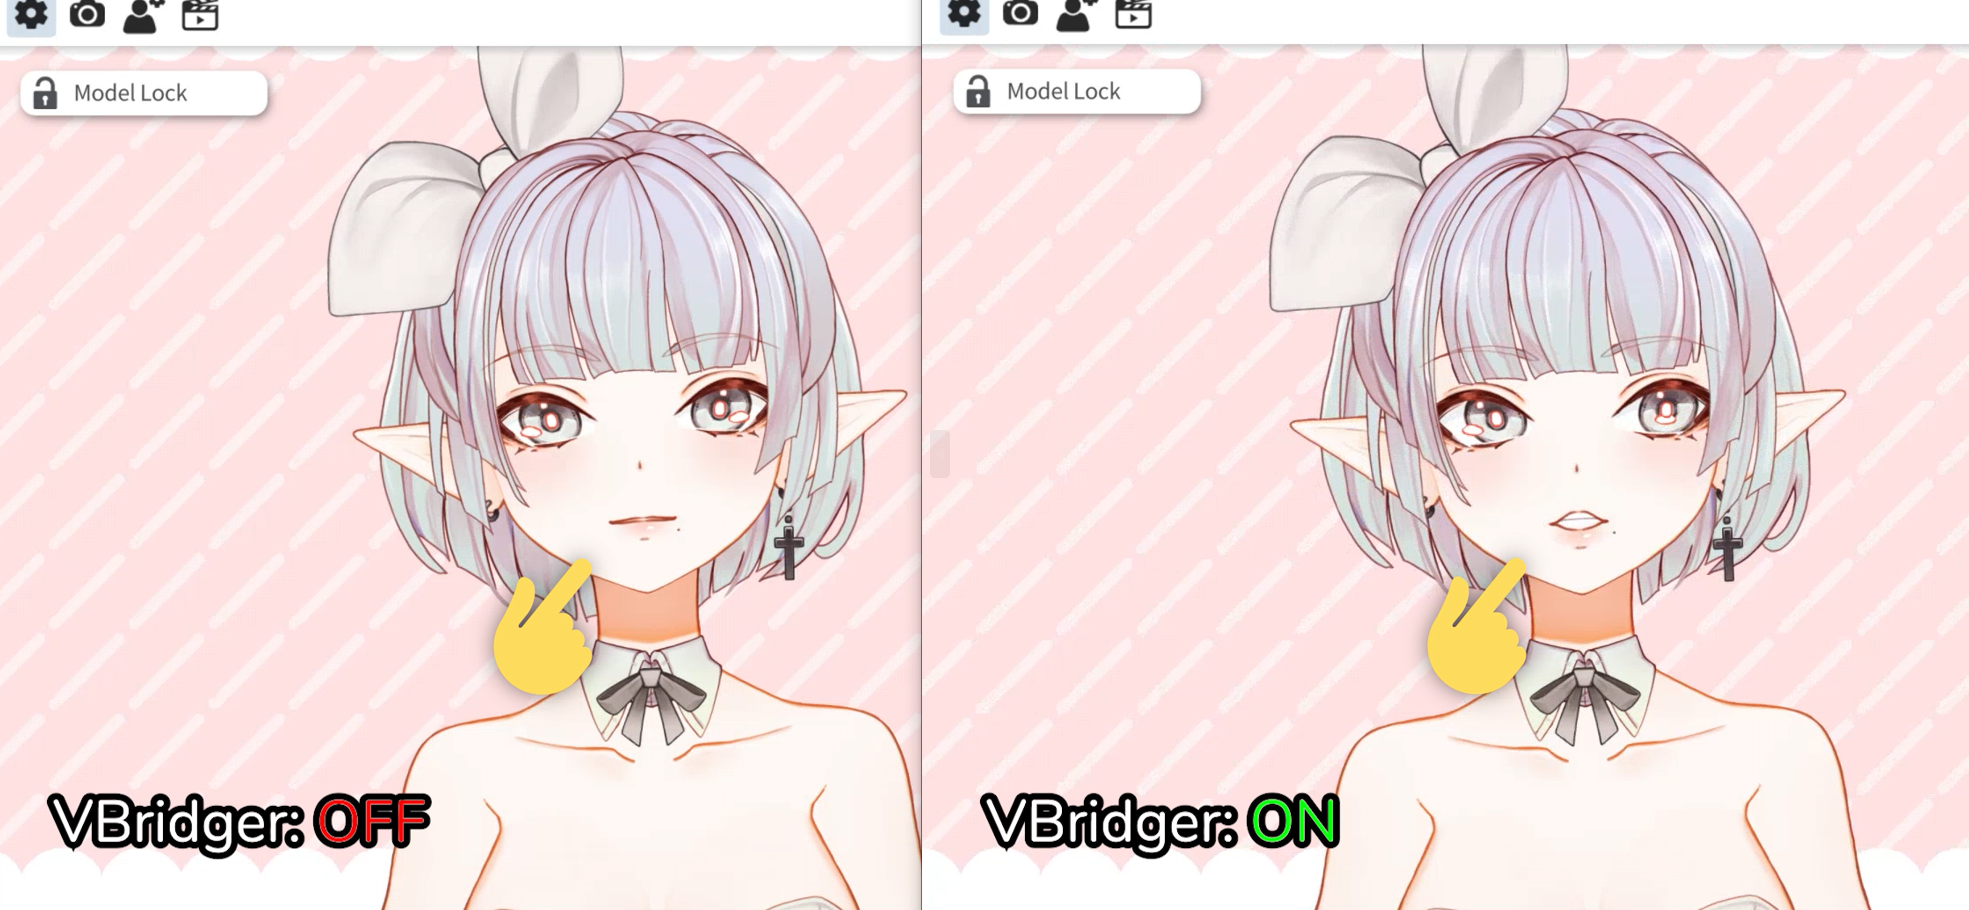
- To test if VBridger is working, purse your lips with your teeth visible. Something similar to this face should show up.